Quantcast
Channel: blog – Alexander Ollischer | Citrix | Microsoft
Viewing all 59 articles
Browse latest View live

XenMobile 10.x and NetScaler 10.x – A Comprehensive HowTo Guide

$
0
0

During implementing quite some XenMobile 10.x solutions in the last couple of months I came across some issues that caused quite some headaches. Therefore I’d like to document and share my lessons learned in this new blog.

As all my implementations were with existing NetScaler 10.x configurations already in place, I was not able to follow all those XenMobile 10.x installation and configuration guides out there by the book. All of those blogs and guides have one thing in common: they assume your start from scratch with both XenMobile 10.x and NetScaler 10.x and thus miss the point in merging XenMobile 10.x requirements with NetScaler 10.x, i.e. adding all those nasty MDM/MAM LB VIPs, DNS records, firewall rules, certificates, Session Policies and Profiles, et al.

I’m trying to shed some light on how to add a new XenMobile 10.x installation to an already existing NetScaler Gateway configuration.

This blog is comprised of the following topics:

Work in Progress

As implementing and configuring XenMobile can be quite a huge and complex task, I intend to update this article on a regular basis in order to get as close to a comprehensive guide as possible regarding this topic.

Prerequisites & Requirements:

For starters I’d like to recommend the following blogs for all those people out there who start from scratch with both XenMobile and NetScaler, as they provide loads of information on prerequisites and all things required for a (almost) hazzle free implementation:

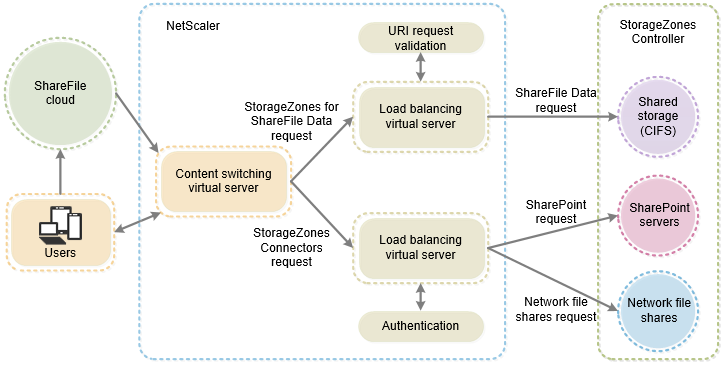
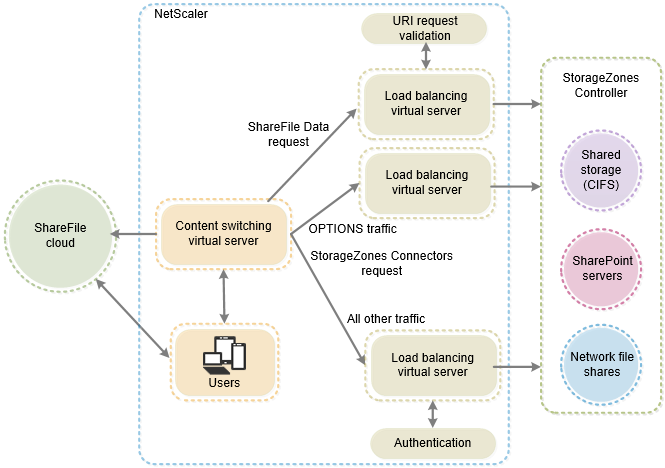
The XenMobile architecture is quite a beast to tame and needs a lot of mastering in order to beat all its intricacies. Just have a look at the following architecture diagram for a fully blown up XenMobile 10.x MDM+MAM solution placed in your internal network:

XenMobile-RA-MAM-MDM

Recommendations:

Ensure you have all this at your hands and/or access to prior to doing anything else as this will definitely delay your progress in implementing XenMobile:

  • Apple Developer Account
  • Apple Push Notification Certificate
  • Microsoft Company Developer Account
  • Google Play Store Account and Google Device ID
  • Auto Discovery Actions
  • DNS Registrations
  • Network Connections, e.g. Firewall Rules
  • Active Directory/LDAP Service Accounts

Furthemore I recommend conducting the following Connectivity Tests on both NetScaler and XenMobile Device Manager to ensure that especially required network connections can be successfully established:

  • NetScaler Connectivity Tests
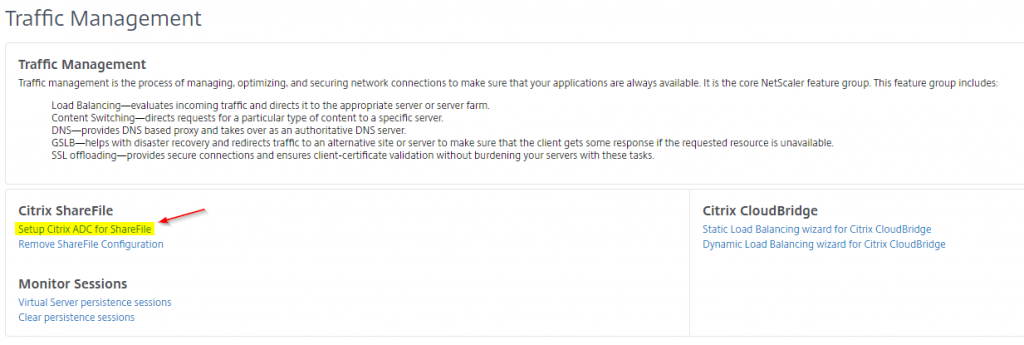
    • can be found on NetScaler | Configuration | Integrate with Citrix Products | XenMobile | Test Connectivity:

15-06-_2016_11-41-53

15-06-_2016_11-46-10

  • XenMobile Connectivity Tests
    • can be found on XenMobile | Support [Wrench Tool] | Diagnostics | XenMobile Connectivity Checks:

15-06-_2016_11-52-18

Enable all checks listed in the XenMobile Connectivity Checks table by activating the checkbox at the top left corner, then click Test Connectivity at the bottom right corner:

15-06-_2016_14-23-30

Ensure that all XenMobile Connectivity Checks are greenlit, i.e. are passed successfully:

15-06-_2016_14-26-10

In case of an error you could left-click the corresponding table entry in order to receive further information and helpful tips on the underlying issue:

15-06-_2016_14-49-11

Rinse and repeat until all checks are successful.

Security:

In order to achieve the renown A+ rating by Qualys’ SSLLabs Check, you need to adjust a couple of security related settings in NetScaler. The following articles provide step-by-step instructions on how to achieve this goal:

After adjusting your settings you can verify the results with one of the following websites. Note that the last one (Qualys’ SSL Labs Checker) is mostly recommended:

Q&A:

The following articles and blogs are a must read for a deeper understanding of and an insight look into XenMobile 10.x

I tried to create a table showing required IP addresses as well as corresponding NetScaler Gateway vServers necessary for a working XenMobile implementation with an existing NetScaler Gateway configuration:

XenMobile and NetScaler IP Addresses

FQDN/HostnameDescriptionIP AddressNote
mobile.domain.de [internal]
XenMobile Server's FQDN, internally as well as externally; internal IP points to XenMobile Server directly10.0.0.240to make XenMobile Server reachable from internal networks (for administrative purposes); dedicated DNS address record in your internal DNS Zone
mobile.domain.de [external]XenMobile Server's FQDN, internally as well as externally; external IP points to _XM_LB_MDM_XenMobile VIP directly (Ports 443 and 8443)e.g. 1.2.3.4 (=> 10.0.0.228)for registration and enrollment to successfully occur, traffic on both Ports 443 and 8443 must be directed to NetScaler Gateway's vServer IP address (_XM_LB_MDM_XenMobile)
nsip.domain.localNetScaler Management IP10.0.0.252
vpx.domain.de [external]NetScaler Gateway's external FQDN, pointing to Gateway vServer providing XenMobile Session Policy and Profilee.g. 5.6.7.8 (=> 10.0.0.251)existing NetScaler Gateway vServer for access to XenApp/XenDesktop as well as XenMobile resources
_XM_MAM_LB_10.0.0.232_8443XenMobile Server's LB VIP on NetScaler (Port 443), referred to NetScaler Gateway vServer (vpx.domain.de) Session Profile (Account Services Address: https://mobile.domain.de:8443)10.0.0.232
_XM_LB_MDM_XenMobileMDM_10.0.0.228_443XenMobile Server's LB VIP on NetScaler (Port 443), referred to by externally resolvable FQDN (mobile.domain.de)10.0.0.228
_XM_LB_MDM_XenMobileMDM_10.0.0.228_8443XenMobile Server's LB VIP on NetScaler (Port 8443), referred to by externally resolvable FQDN (mobile.domain.de)10.0.0.228
vpx.domain.de [internal]NetScaler Gateway vServer for XenMobile access after succesful enrollment; referred to by XenMobile Server10.0.0.251provides Session Policy and Profile to redirect incoming Worx Home traffic via vpx.domain.de to XenMobile Server
mobile.domain.de [NetScaler DNS Address Record]XenMobile Server's FQDN, internally as well as externally; internal IP must be resolved to _XM_MAM_LB VIP from a NetScaler point of view10.0.0.232dedicated DNS address record is required on NetScaler to directly point traffic to _XM_MAM_LB VIP

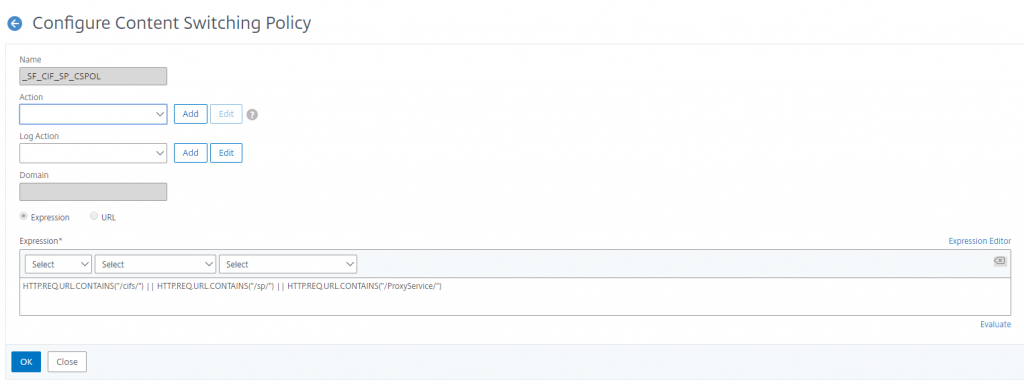
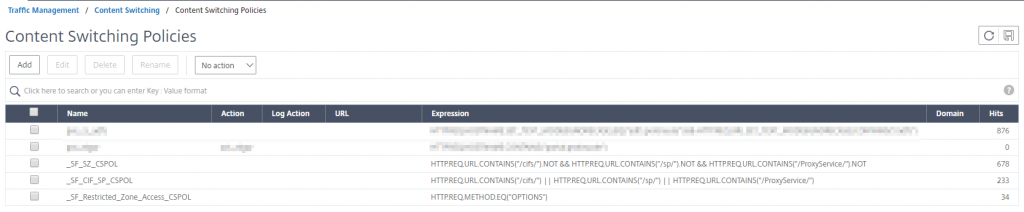
For an already existing NetScaler Gateway configuration the following Session Policy and Profile must be added to the corresponding vServer for XenMobile traffic to be supported. Ensure checking each Session Profile/Action tab’s Advanced Settings as well:

Session Policy:

  • Name: pol_Worx_home_vpx.domain.de
  • Profile: ac_Worx_Home_vpx.domain.de
  • Expression (in my case):
    REQ.HTTP.HEADER User-Agent CONTAINS zenprise && REQ.HTTP.HEADER User-Agent CONTAINS CitrixReceiver && REQ.HTTP.HEADER X-Citrix-Gateway EXISTS || REQ.HTTP.HEADER User-Agent CONTAINS CitrixReceiver && REQ.HTTP.HEADER X-Citrix-Gateway EXISTS && REQ.HTTP.HEADER User-Agent CONTAINS Worx

You could run the following NetScaler command at CLI as well in order to create the corresponding Session Profile/Action:

#add NetScaler Gateway Session Profile
add vpn sessionAction <SessionProfileName> -splitDns BOTH -sessTimeout 1440 -splitTunnel OFF -transparentInterception ON -defaultAuthorizationAction ALLOW -SSO ON -ssoCredential PRIMARY -icaProxy OFF -ClientChoices OFF -forcedTimeout 1440 -clientlessVpnMode ON -clientlessModeUrlEncoding TRANSPARENT -SecureBrowse ENABLED -storefronturl “https://<PublicXenMobileFQDN>:8443”

#add NetScaler Gateway Session Policy
add vpn sessionPolicy <SessionPolicyName> “REQ.HTTP.HEADER User-Agent CONTAINS CitrixReceiver && REQ.HTTP.HEADER X-Citrix-Gateway EXISTS” <SessionProfileName>

#add NetScaler Gateway Session Policy (alternative)
add vpn sessionPolicy <SessionPolicyName> “REQ.HTTP.HEADER User-Agent CONTAINS zenprise && REQ.HTTP.HEADER User-Agent CONTAINS CitrixReceiver && REQ.HTTP.HEADER X-Citrix-Gateway EXISTS || REQ.HTTP.HEADER User-Agent CONTAINS CitrixReceiver && REQ.HTTP.HEADER X-Citrix-Gateway EXISTS && REQ.HTTP.HEADER User-Agent CONTAINS Worx” <SessionProfileName>

Session Profile / Action:

TabOptionOverride GlobalValue
Client ExperienceSplit TunnelYOFF
Client ExperienceSession Time Out (mins)Y1440
Client ExperienceClientless AccessYON
Client ExperienceClientless Access URL EncodingYCLEAR
Client ExperiencePlugin TypeYWindows/MAC OS X
Client ExperienceSingle Sign-on to Web ApplicationsYCheckbox checked
Client ExperienceCredential IndexYPRIMARY
SecurityDefault Authorization ActionYALLOW
SecuritySecure BrowseYENABLED
Published ApplicationsICA ProxyYOFF
Published ApplicationsAccount Services AddressYhttps://mobile.domain.de:8443
NetScaler XenMobile 10 Session Profile

Troubleshooting:

Keep in mind that for troubleshooting purposes it’s always recommendable to not just turn to XenMobile’s and NetScaler’s Connectivity Tests (as mentioned above), but to its logging capabilities as well, i.e. investigating its corresponding Debug Logs, Admin Audit Logs, and User Audit Logs, which can be found under in Support [Wrench Tool] | Log Operations | Logs:

10-06-_2016_12-13-28

Log Levels can be adjusted accordingly in Support [Wrench Tool] | Log Operations | Log Settings.

iOS Enrollment Issues:

Worx Home Enrollment Error – Push service on server is not enabled. Please contact the administrator.

20160601_112119000_iOS

Make sure your XenMobile server has internet access and can reach ports TCP 2195 and TCP 2196 at destination APNs hosts using the public IP address 17.0.0.0/8. Have a look at Citrix eDocs – Port Requirements as well.

Worx Home Enrollment Error – Profile Installation Failed. A network error has occured.

20160606_130239000_iOS

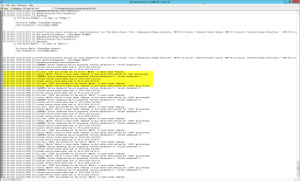
In my case it turned out that XenMobile server’s hostname deviated from my external FQDN as I configured it with an internal FQDN instead. I dug deep into XenMobile server’s Debug Log File and found the following entry while trying to enroll my iOS device:

08-06-_2016_10-16-56

Unfortunately you cannot change the hostname afterwards, thus requiring you to reinstall XenMobile. So make sure that during initial configuration, while defining the XenMobile Server FQDN, it equals your external FQDN:

08-06-_2016_08-51-3608-06-_2016_08-55-13

Worx Home Enrollment Error – Access to your company is not currently available.

20160608_080510000_iOS

Ensure that XenMobile Server’s certificate including corresponding private key and certificate chain is complete and intact:

08-06-_2016_09-05-43

Best practice is to import the server certificate in PFX file format including

  • private key,
  • all certificates in the certification path,
  • and extended properties.

During import you should select all options as depicted:

  • Import: Keystore
  • Keystore type: PKCS#12
  • Use as: Server
  • Keystore file: <certificate.pfx>
  • Password: <password to your private key>

08-06-_2016_09-05-20

In the end it should look like this in order for you to successfully register and enroll a device with XenMobile:

  • Server
  • SSL Listener
  • SAML
  • APNs

08-06-_2016_09-10-59

Worx Home Enrollment Error – An error occurred. The enrollment will stop.

20160608_112129000_iOS

XenMobile Debug Log: missing x-citrix-device-ID

The following bugs relate to an integration between XenMobile and NetScaler for the following versions of NetScaler when the TLS 1.2 security protocol is configured on NetScaler:

  • NetScaler 11.x versions earlier than 11.0.64
  • 10.5.59
  • 10.5.58

Note that the issue does not arise when your XenMobile MAM deployment includes a NetScaler load balancer between the XenMobile server and NetScaler Gateway.

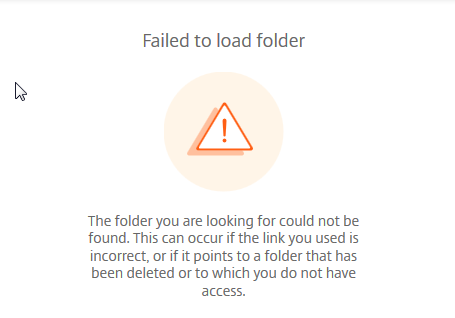
Communication between NetScaler Gateway and XenMobile in MAM mode fails due to issues with a backend TLS 1.2 session. As a result, users cannot download apps from the WorxStore, nor files from ShareFile, when connecting to the internal network.

see: XenMobile Server 10.3 Known Issues

or:

When updating from XenMobile 10.1 to version 10.3, if the WorxStore has a custom name, you must change the store name to the default setting of Store and deploy the setting to devices before updating. If not, the custom store name causes issues with XenMobile 10.3 enrollment, access to Worx Home and the WorxStore, and app deployment on iOS devices.

see: Citrix Discussions – Login over MAM no more possible

XenMobile Debug Log: URLRequestFailedMessage

Make sure your NetScaler Session Policy and Profile are configured as described above.

see: Citrix Discussions – Issue with MAM

Security:

Read Anton van Pelt’s blog on hardening your NetScaler configuration in order to receive the most precious of ratings: the Qualys SSL Labs A+ Rating. Most recommendable! And there are a lot of Citrix Mobility and NetScaler Master Class videos available on YouTube. Make sure to check them out as well!

Further Reading:


Citrix XenDesktop 7.x – Client Drive, LPT and COM Port Mapping not working properly

$
0
0

Starting with Citrix XenDesktop 7.x there have been some features that have been deprecated by Citrix, such as LPT and COM Port Mapping, which are not working as expected or properly after upgrading to VDA 7.x. I stumbled upon this quite annoying issue as soon as I upgraded my existing Citrix XenApp servers to the latest XenDesktop 7.x, i.e. Hosted Shared Desktops with Virtual Desktop Agents v7.x.

As for me my legacy servers, that is Citrix Presentation Server 4.5, had COM Port Mapping/Redirection enabled, in order to provide access to a locally installed COM Port devices (data logger reading devices) for XenApp published applications. This worked fine as long as the system has not been touched by any means. While migrating to XenDesktop 7.x (with all new shiny Windows Server 2008 R2 and Windows Server 2012 VMs), I had to install and upgrade all previously used applications in order to make them work on the new Microsoft O/S. Even the data logger reading application made it to Windows Server 2012, as an upgrade was available. But from then on I had quite some trouble getting the COM Port Mapping/Redirection feature back to work as it previously did…

As you might have noticed there is a Citrix Policy setting in Citrix Studio that says:

  • Client COM Port Redirection
  • Auto Connect Client COM Ports

I eagerly configured those policy settings in order to allow and redirect COM ports, but it didn’t work. These settings simply did nothing! I realized that these settings only take effect if used with XenDesktop versions up to v5.6 FP1. With later VDAs, such as v7.x, it doesn’work anymore. I did some digging and found something in Citrix eDocs titled Features not in this release:

COM Port Mapping — COM Port Mapping allowed or prevented access to COM ports on the user device. COM Port Mapping was previously enabled by default. In this release, COM Port Mapping is disabled by default. For details, see Configure COM Port and LPT Port Redirection settings using the registry.

And further:

Policy settings for COM Port and LPT Port Redirection have been deprecated from the Studio, and moved to the registry, and are now located under HKLM\Software\Citrix\GroupPolicy\Defaults\Deprecated on either your Master VDA image or your physical VDA machines.

Alas! A solution to my problem. Mind that all registry keys depicted in the following table are of type REG_DWORD:

Registry KeyRegistry Key TypeDescriptionValues
AllowComPortRedirectionREG_DWORDAllow or prohibit COM port redirection 1 (Allow) or 0 (Prohibit)
LimitComBwREG_DWORDBandwidth limit for COM port redirection channel Numeric value
LimitComBWPercentREG_DWORDBandwidth limit for COM port redirection channel as a percentage of total session bandwidth Numeric value between 0 and 100
AutoConnectClientComPortsREG_DWORDAutomatically connect COM ports from the user device1 (Allow) or 0 (Prohibit)
AllowLptPortRedirectionREG_DWORDAllow or prohibit LPT port redirection1 (Allow) or 0 (Prohibit)
LimitLptBwREG_DWORDBandwidth limit for LPT port redirection channelNumeric value
LimitLptBwPercentREG_DWORDBandwidth limit for LPT port redirection channel as a percentage of total session bandwidthNumeric value between 0 and 100
AutoConnectClientLptPortsREG_DWORDAutomatically connect LPT ports from the user device1 (Allow) or 0 (Prohibit)


Further reading:

Citrix NetScaler v11 – How to setup your NetScaler as an AD FS proxy

$
0
0

This short blog describes how to enable NetScaler 11’s Content Switching feature to proxy your AD FS infrastructure thus getting rid of a dedicated AD FS Proxy server.

Courtesy of Trond Eirik Haavarstein it was quite easy to enable NetScaler 11 to proxy my AD FS 3.0 implementation instead of a separate dedicated ADFS proxy. I scoured the Internet for ages to find a working guide regarding NetScaler and AD FS fronting. Finally, it’s here, and I’d like to further spread the word!

In order to successfully implement this solution the following requirements must be met (see HowTo – Install and Configure Microsoft Active Directory Federation Services 3.0 (ADFS 3.0) as well):

  1. Server Certificate
  2. Public IP Address
  3. DNS A-Record
  4. AD FS Service up and running

To understand how AD FS works, let’s look at what happens when a federated user tries to log into, say, Office 365 (or ShareFile):

20161104_netscaler_adfs_proxy

  1. An end user tries to log into Office 365 using his user principal name (UPN).
  2. The authentication platform verifies the UPN and sees that the end user is a federated identity. It redirects the authentication request to the end user’s AD FS server. The Office 365 platform knows the URL because a trust was set up earlier between the AD FS infrastructure and Office 365.
  3. The client connects to the AD FS proxy (now represented by NetScaler’s Content Switching vServer) and provides credentials.
  4. The AD FS proxy (read: NetScaler) forwards the authentication request to the AD FS server.
  5. The AD FS server verifies the credentials with the local Active Directory.
  6. When the credentials are verified, a Domain Controller returns a Kerberos token to the AD FS server.
  7. The AD FS server disregards the Kerberos token and crafts a new AD FS token, which it forwards to the AD FS proxy server (read: NetScaler).
  8. The AD FS proxy server (read: NetScaler) forwards the AD FS token to the client.
  9. The client presents the AD FS token to Office 365, is authenticated, and logged in.

1. Server Certificate

…including the corresponding AD FS domain names (PFX file format, i.e. including Private Key, for the corresponding NetScaler Virtual Servers and required Subject Alternate Names (SAN)). I used the exact same Server certificate that’s implemented on my AD FS IIS server.

2. Public IP Address

…pointing to Netscaler’s Content Switching Virtual Server, by means of a corresponding firewall rule forwarding traffic on port 443 (https).

3. DNS A-Record

…e.g. adfs.domain.com, pointing to your Netscaler’s Content Switching Virtual Server, i.e. the aforementioned Public IP Address (keep in mind that the FQDN at least must match the Server Certificate’s Subject Alternate Name (SAN)).

4. AD FS Service

…running and working properly on the internal network, obviously.

5. NetScaler Configuration

I have to agree that configuring NetScaler with CLI is much more easier and faster compared to using the GUI. I recommend getting to grips with to its CLI syntax as it’s like using PowerShell: fast, efficient, transparent. The following commands (borrowed from Trond and slightly adjusted for my purposes) should help you getting to know CLI:

You have to manually replace the following with your corresponding information:

  • 10.0.0.221 with IP address of your internal AD FS server
  • unified with the name of your NetScaler Content Switching vServer name
  • adfs.domain.com with the FQDN of your external DNS A-Record (read: Subject Alternate Name)
  • YourCertName with the Display Name of your Server Certificate

enable ns feature LB CS SSL SSLVPN AAA REWRITE
add server adfs 10.0.0.221
add service adfs_https adfs SSL 443 -gslb NONE -maxClient 0 -maxReq 0 -cip ENABLED X-MS-Forwarded-Client-IP -usip NO -useproxyport YES -sp ON -cltTimeout 180 -svrTimeout 360 -CKA NO -TCPB NO -CMP YES
add lb vserver vip_adfs_https SSL 0.0.0.0 0 -persistenceType NONE -cltTimeout 180
add cs policy adfs -rule "HTTP.REQ.HOSTNAME.SET_TEXT_MODE(IGNORECASE).EQ(\"adfs.domain.com\") && HTTP.REQ.URL.SET_TEXT_MODE(IGNORECASE).CONTAINS(\"/adfs\")"
add rewrite action rewrite_adfs_ProxyHeader insert_http_header X-MS-Proxy "\"NETSCALER\""
add rewrite action rewrite_adfs_Mex replace HTTP.REQ.URL.PATH_AND_QUERY "\"/adfs/services/trust/proxymex\" + HTTP.REQ.URL.SET_TEXT_MODE(IGNORECASE).PATH_AND_QUERY.STRIP_START_CHARS(\"/adfs/services/trust/mex\").HTTP_URL_SAFE"
add rewrite policy rw_pol_adfs_ProxyHeader "http.REQ.URL.TO_LOWER.STARTSWITH(\"/adfs\")" rewrite_adfs_ProxyHeader
add rewrite policy rw_pol_adfs_Mex "http.REQ.URL.TO_LOWER.STARTSWITH(\"/adfs/services/trust/mex\")" rewrite_adfs_Mex
bind lb vserver vip_adfs_https adfs_https
bind lb vserver vip_adfs_https -policyName rw_pol_adfs_ProxyHeader -priority 100 -gotoPriorityExpression NEXT -type REQUEST
bind lb vserver vip_adfs_https -policyName rw_pol_adfs_Mex -priority 110 -gotoPriorityExpression END -type REQUEST
bind cs vserver unified -policyName adfs -targetLBVserver vip_adfs_https -priority 70
add lb monitor mon_adfs_https HTTP-ECV -customHeaders "host: adfs.domain.com\r\n" -send "GET /federationmetadata/2007-06/federationmetadata.xml" -recv "adfs.lauterfresser.de/adfs/services/trust" -LRTM ENABLED -secure YES
bind service adfs_https -monitorName mon_adfs_https
bind ssl vserver vip_adfs_https -certkeyName YourCertName

netscaler_adfs_01

Verify that everything’s working as expected:

netscaler_adfs_04

netscaler_adfs_03

netscaler_adfs_02

Finally, you could navigate to your newly added AD FS URL and check whether AD FS is working properly (see HowTo – Install and Configure Microsoft Active Directory Federation Services 3.0 (ADFS 3.0) as well).

Once again: many thanks, Trond! Awesome work!

Further reading:

Exchange 2016 – HTTP Error 500 after logging into ECP/OWA

$
0
0

After logging into Exchange 2016’s ECP you receive an HTTP Error 500 (same goes with OWA):

06-12-_2016_12-23-00

Searching the internet ends up with several possible solutions to this issue, ranging from missing System Attendant Mailboxes, to bogus ADSI settings regarding the Exchange CAS Service. I tried several of them to no prevail.

And it doesn’t matter whether you enter DOMAIN\Administrator or administrator@domain.local for your username. In most cases the simplest solution is to execute UpdateCas.ps1 PowerShell script located in the C:\Program Files\Microsoft\Exchange Server\V15\Bin folder, followed by an IISReset:

06-12-_2016_13-58-01 

Once there was a case where UpdateCas.ps1 didn’t work, which left me with executing the following PowerShell cmdlets, in subsequent order:

  1. Get-OwaVirtualDirectory | Set-OwaVirtualDirectory -FormsAuthentication $False -BasicAuthentication $True
  2. Get-OwaVirtualDirectory | Set-OwaVirtualDirectory -FormsAuthentication $True -BasicAuthentication $True
  3. Get-EcpVirtualDirectory | Set-EcpVirtualDirectory -FormsAuthentication $false -BasicAuthentication $true
  4. Get-EcpVirtualDirectory | Set-EcpVirtualDirectory -FormsAuthentication $true -BasicAuthentication $true
  5. iisreset

Again, one Exchange 2016 Server in particular was immune against all those tricks and needed the following adjustments:

  1. Get-EcpVirtualDirectory | Set-EcpVirtualDirectory -FormsAuthentication $false -BasicAuthentication $true -WindowsAuthentication $true
  2. Get-OWAVirtualDirectory | Set-OWAVirtualDirectory -FormsAuthentication $false -BasicAuthentication $true -WindowsAuthentication $true
  3. iisreset
  4. Recycle MSExchangeECPAppPool
  5. Recycle MSExchangeOWAAppPool

Keep in mind that Authentication Settings for both Virtual Directories ECP and OWA must be identical. After that I was able to successfully log into ECP and OWA again.

Further reading:

Citrix NetScaler v11 – How to setup your NetScaler as an RDS RD Gateway

$
0
0

If you want to use your NetScaler for all things that need to be accessible from the outside, over a single IP address, that poses an issue. As is usually a problem with small to medium sized businesses which only have one public IP address at their disposal, and need to implement features like a fully functional RDS environment (with RD Web Access, RD Gateway, etc), a XenApp/XenDesktop evnironment with StoreFront, and even AD FS, say, for Office365. Generally all these services require port 443 (https) to be fully functional, and you can only set up one distinctive IP address on your NetScaler providing this service, pointing it to your internal resources via Firewall rules, thus leaving you with only one option: NetScaler’s Unified Gateway and Content Switching features. 

In this case keep in mind that we’re not talking about NetScaler’s native RDP Proxy feature as described by Carl Stalhood in his article here. Instead we’re utilizing Content Switching and Unified Gateway features in order to use NetScaler as a frontend for your RDS Gateway and RDWeb, and pass traffic through NetScaler to your internal network, thus allowing you to successfully establish RDP sessions to Published Remote Apps from external networks with NetScaler.

Again, courtesy of Trond Eirik Haavarstein and Dave Brett, without whom this article wouldn’t have been possible in the first place!

This article can be considered a continuation of my previous article Citrix NetScaler v11 – How to setup your NetScaler as an AD FS proxy , and is partly based on requirements and configuration steps described there.

I verified and tested all these settings with Windows Server 2012 R2, a public Server Certificate issued by StartCom, and NetScaler v11.1 48.10nc.

Requirements on the Microsoft side of things

  1. a fully working and functional RD Gateway and RDWeb deployment,
  2. with corresponding Server Certificate in place,
  3. and a secondary IP address and corresponding binding in IIS with SNI enabled (in my case for AD FS and RDWeb, respectively),
  4. adjust my RDPublishedName via Set-RDPublishedName.ps1 script.

Requirements on NetScaler

  1. as well as NetScaler SNI Feature enabled,
  2. RDP Load Balancing vServer (Port 3389),
  3. internal and external DNS Records adjusted accordingly.

In order to successfully get RDS up and running on my existing AD FS server I did the following:

  • added a second IPv4 address to the server to represent each https service seperately, i.e. 10.0.0.221 for AD FS, and 10.0.0.220 for RDS, respectively:
    24-11-_2016_08-24-12
  • enabled IIS SNI support on my Default Web Site by adding corresponding Server Certificates to Site Bindings:
    24-11-_2016_08-31-07 24-11-_2016_08-31-50
  • configured IIS Site Bindings for my Default Web Site to use those IPv4 addresses, i.e. 10.0.0.221 for AD FS, and 10.0.0.220 for RDS, respectively:
    24-11-_2016_08-25-38
  • configured my RDS Deployment Properties to represent the Server Certificate’s FQDN as Server Name and selected the corresponding Server Certificate for its Role Services:
    • RD Connection Broker – Enable Single Sign On
    • RD Connection Broker – Publishing
    • RD Web Access
    • RD Gateway
      24-11-_2016_08-33-24 24-11-_2016_08-34-00
  • adjusted my RDS Server Properties within RD Gateway Manager console to use the corresponding Server Certificate representing my deployment’s public FQDN (SSL Certificate tab):
    24-11-_2016_08-35-45
  • enabled UDP Transport in my RDS Server Properties (Transport Settings tab):
    24-11-_2016_08-48-32
  • and adjusted my RDPublishedName via Set-RDPublishedName.ps1 script:
    24-11-_2016_08-54-51
  • in the end I verified that both my AD FS and RDWeb deployments still worked by navigating to the corresponding URLs:
    • AD FS: https://adfs.domain.com/adfs/fs/federationserverservice.asmx
    • RDWeb: https://rdweb.domain.com/rdweb
      24-11-_2016_09-03-14 24-11-_2016_09-01-28

NetScaler CLI Commands

You have to manually replace the following with your corresponding information:

  • 10.0.0.220 with IP address of your internal RD Gateway server
  • rdweb.domain.com with the FQDN of your external DNS A-Record (read: Subject Alternative Name)
  • YourCertName with the Display Name of your Server Certificate

add server rdgw 10.0.0.220
add serviceGroup svcgrp_rdgw_https SSL -maxClient 0 -maxReq 0 -cip DISABLED -usip NO -useproxyport YES -cltTimeout 180 -svrTimeout 360 -CKA NO -TCPB NO -CMP NO
add lb vserver vip_rdgw_https SSL 0.0.0.0 0 -persistenceType SOURCEIP -timeout 5 -cltTimeout 180
add cs action act_rdgw -targetLBVserver vip_rdgw_https
add cs policy rdgw -rule "HTTP.REQ.HOSTNAME.CONTAINS(\"rdweb.domain.com\")" -action act_rdgw
bind lb vserver vip_rdgw_https svcgrp_rdgw_https
bind cs vserver unified -policyName rdgw -priority 80
bind serviceGroup svcgrp_rdgw_https rdgw 443
set ssl vserver vip_rdgw_https -SNIEnable ENABLED
bind ssl serviceGroup svcgrp_rdgw_https -certkeyName YourCertName
bind ssl vserver vip_rdgw_https -certkeyName YourCertName
save ns config

Furthermore you might have to add the following Content Switching configuration according to Jakob Rutski‘s blog article Load Balancing Remote Desktop Gateway with Citrix NetScaler Part 2:

Name: CSW-RDG-Mobile
Action: CSW-RDG-Action
Expression: HTTP.REQ.HEADER(“User-Agent”).CONTAINS(“MSRPC”)

Verify that everything’s working as expected:

 18-11-_2016_10-48-03

18-11-_2016_10-56-16

18-11-_2016_10-57-24

18-11-_2016_10-58-19

Finally, you could navigate to your newly added RDWeb URL (e.g. https://rdweb.domain.com/RDWeb) and check whether it’s working properly, i.e. you can initiate an RDP session and successfully launch a published RemoteApp:

18-11-_2016_11-01-41

18-11-_2016_11-02-15

Further reading:

Citrix XenDesktop 7.x – Query Citrix Receiver Versions connecting to your environment – XLS Report

$
0
0

Just recently I was tasked to identify all Citrix Receiver Versions connecting to a Citrix XenDesktop 7.x environment.

For starters, to get information on current sessions issue the following PowerShell cmdlets on your Citrix Broker Server:

  1. Add-PSSnapin *Citrix*
  2. Get-BrokerSession | Select MachineName,UserName,ClientPlatform,ClientVersion,*Protocol* | Out-GridView
    14-12-_2016_14-00-00

To get hands on every single information of your current Broker Sessions simply run:

  1. Get-BrokerSession | Out-GridView

Now, in terms of historical session and connection information you have to query the OData API (http://<ServerBrokerFQDN>/Citrix/Monitor/OData/v2/Data), as with the Get-BrokerSession cmdlet you only get information on current sessions. So in case you’re looking for historical reports and data, which you cannot find in the Director Web UI, you could simply create a custom report with Microsoft Excel by connecting to the Data Feed.

This leaves me with recommending the following Citrix Blog Article, that explains how to

  • connect and read the available OData Data Feed from your Citrix Broker Server,
  • read the content of the Connection table and import it into an Excel Sheet,
  • limit the data’s timeframe we’re looking at,
  • add a PivotChart, and
  • filter the required data.

The result might look something like this:

14-12-_2016_14-48-30

You can then tinker with the different tables available through the Data Feed in order to achieve the resultant data set required for your purpose. As opposed to the aforementioned Citrix Blog you could select the following tables to even get information on Citrix Receiver Versions, Client Names, and corresponding User Names:

  • Connection
  • Session
  • User

Just have a look at the underlying SQL DB and its Database Diagram in order to reveal the tables’ relationships:

Relationship NameTable NameTables SpecificationColumns Specifiation
Session_UserSessionsForeign Key ColumnUserId
UsersPrimary Key ColumnId
Connection_SessionForeign Key ColumnSessionKey
Primary Key ColumnSessionKey
Session_CurrentConnectionConnectionsForeign Key ColumnCurrentConnectionId
SessionsPrimary Key ColumnId

14-12-_2016_15-23-07

Then you should be able to rebuild these relationships within Microsoft Excel and get the resultant set of data including corresponding user names:

Otherwise you could create a corresponding View directly within SQL Server Management Studio on the server hosting your XenDesktop SQL Monitoring database. I created one and called it v_ReceiverVersions, thus allowing me to access the data through Excel as well. The custom View includes the aforementioned tables

  • Connection (MonitorData)
  • Session (MonitorData)
  • User (MonitorData)

SELECT MonitorData.Connection.ClientName, MonitorData.Connection.ClientVersion, MonitorData.Connection.BrokeringDate, MonitorData.[User].Upn
FROM MonitorData.Connection INNER JOIN
MonitorData.Session ON MonitorData.Connection.SessionKey = MonitorData.Session.SessionKey AND
MonitorData.Connection.Id = MonitorData.Session.CurrentConnectionId INNER JOIN
MonitorData.[User] ON MonitorData.Session.UserId = MonitorData.[User].Id

This setup allows me to filter the available data (i.e. set to the required period in time by utilizing the BrokeringDate) by either choosing ClientName, ClientVersion or UPN:

The data available in Citrix Director is dependent on your Citrix License, which in turn determines your usage data retention within Citrix Director. As per Citrix:

  • All editions: Director – real-time monitoring and basic troubleshooting (up to 7 days of data)
  • XD7 Platinum: EdgeSight performance management feature – includes #1 + historical monitoring (up to a full year of data through the monitoring SQL database)
  • XD7 Platinum + NetScaler Enterprise: EdgeSight performance management and network analysis – includes #2 plus 60 mins. of network data
  • XD7 Platinum + NetScaler Platinum: EdgeSight performance management and network analysis – includes #2 plus unlimited network data

Further reading:

Exchange 2016 Migration – Finishing Touches – Post Migration Tasks

$
0
0

As I did quite some Exchange migrations (including single as well as multi tenancy environments) I was always wondering whether there are any additional post migration tasks that need to be addressed before you start removing your legacy Exchange server(s) from your organization. For instance, as with migrating from Exchange 2003 to, say, Exchange 2010 you had to update Global Address Lists, Address Lists, Offline Address Books, et al to the new Exchange 2010 version by executing the corresponding cmdlts, e.g. Move-OfflineAddressBook. Now when migrating from Exchange 2010 to Exchange 2016 (or even just from Exchange 2013 to Exchange 2016 with both having an almost identical architecture) what remains of those post migration tasks? Which ones are a necessity? What kind of architectural changes require you to think different and adjust certain settings prior to removing your legacy Exchange server(s)?

By talking about post migration tasks, what do I mean? Well, after you’ve successfully migrated all your databases, mailboxes, public folders, send/receive connectors, et al, what’s still left? Maybe the not so obvious parts of your Exchange infrastructure that need addressing as well in order to avoid any unwanted behaviors and/or errors after you removed the last legacy Exchange server from your organization.

The following article is a concentrated and (hopefully) comprehensive set of information collected from various sources. I’m not reinventing the wheel here, just trying to consolidate every kind of post migration task that deems necessary for a successful Exchange 2016 migration. Pls feel free to comment whether this all still is reasonable and required.

The article consists of the following topics:

  1. System/Arbitration Mailboxes
  2. Distribution Groups
  3. Offline Address Books
  4. Address Book Policies
  5. Global Address Lists
  6. Address Lists
  7. IIS Log Analysis
  8. Send Connectors
  9. Receive Connectors
  10. Update Internal DNS Records

1. System/Arbitration Mailboxes

Before any production services are cut over to Exchange 2016 it is imperative to move the arbitration mailboxes. Arbitration mailboxes are system mailboxes used to store organization-wide data, e.g. administrator audit logs, metadata for eDiscovery searches, and Unified Messaging data. They need to be hosted on the highest version of Exchange in the organization. The mailboxes themselves are typically quite small and will move fairly quickly.

Run the following command to move the mailboxes to a database on your Exchange 2016 server:

Get-Mailbox -Arbitration | New-MoveRequest -BatchName "Arbitration" -TargetDatabase <NameOfTargetDB>

Verify that you’ve successfully migrated all of your abritration mailboxes to an Exchange 2016 database by running:

Get-Mailbox -Arbitration | ft Name, DisplayName, Database -AutoSize

Further reading:


2. Distribution Groups

For each message that is sent to a distribution group, Exchange must access the full membership list to route the message to all recipients. Expansion servers route messages that are sent to a single distribution list or group for each of the recipient objects in that list or group. When a user sends a message to a group, the Exchange server that is acting as the expansion server expands the group to its individual members. This expansion permits members of the distribution list or group to receive the message. An expansion server also resolves the names of all recipients in the distribution list or group, and then determines the most efficient path for routing the message.

Get-DistributionGroup -ResultSize Unlimited | Set-DistributionGroup -ExpansionServer SERV-MAIL.domain.local

Furthermore upgrading distribution groups from Exchange 2007 to Exchange 2016 has 3 steps:

  • Distribution groups must be upgraded
  • Distribution group owners must be set, and
  • the homeMTA property needs to be cleared.  

The following powershell code will set things straight (courtesy of Cooper):

#Forces Upgrade of all distribution groups
Get-DistributionGroup –resultsize unlimited | Set-DistributionGroup –ForceUpgrade
#Set All Distribution Group Owners (Required for Exchange 2010/2013 if missing causes errors)
#Change the owners to the desired domain accounts replace USER@DOMAIN.COM
Get-DistributionGroup -ResultSize Unlimited | Set-DistributionGroup -BypassSecurityGroupManagerCheck -ManagedBy 'USER@DOMAIN.COM’,’USER2@DOMAIN.COM’
#Clear homeMTA property for a single distribution group (If any distribution groups have this property set it can force a specific server to send distribution group messages)
Get-DistributionGroup -ResultSize Unlimited | Set-ADGroup $_.samAccountName -Clear homeMTA

Further reading:


3. Offline Address Books

An OAB is used by Microsoft Outlook clients in Cached Exchange Mode for address book lookups when offline. OABs are also critical in reducing the workload on Exchange servers as cached mode Outlook clients will always query the local OAB first.

Remove Legacy Default OAB:
The legacy offline address book can be removed from the organization when there are no more Exchange 2010 mailbox users. Exchange 2016 mailbox users will be using the new Default OAB created by Exchange 2016 setup (easily identifieable by the subsequent (Ex2013) string in the OAB’s name, e.g. Default Offline Address List (Ex2013)). Simply use the Exchange 2010 Management Console (EMC) to do so. You can then adjust the display name of your new Default OAB at any point in time by running:

Set-OfflineAddressBook “Default Offline Address List (Ex2013)” -Name “Default Offline Address List”

OAB Distribution:
Exchange 2007 and 2010 supported two methods of OAB distribution: web distribution and Public Folder distribution. Exchange 2013/2016  supports the web distribution method only.

1st disable Public Folder Distribution:

Get-OfflineAddressBook -ResultSize Unlimited | Set-OfflineAddressBook -PublicFolderDistributionEnabled $false

2nd enable Web Distribution:

Get-OfflineAddressBook | Set-OfflineAddressBook -VirtualDirectories {SERV-MAIL\OAB (Default Web Site)}

OAB and Generating Mailbox:
In Exchange 2016, the OAB is first generated in the Arbitration Mailbox so understanding which database houses this Arbitration Mailbox is key to understanding the server that is currently responsible for generating the OAB. Once generated, the OAB is then later copied as a series of files to the \ClientAccess\OAB folder on each mailbox server.

We need to move the OAB generation to Exchange 2016. It doesn’t matter how many OABs we have in our organization, but we still need at least one (1) mailbox with PersistedCapabilities of OrganizationCapabilityOABGen, and it doesn’t really matter which mailbox we use. We can even set which mailbox generates which OAB.

First of all identify the current Generating Mailbox, i.e. the Organization Mailbox, and note it’s Name, e.g. SystemMailbox{bb558c35-97f1-4cb9-8ff7-d53741dc928c}:

Get-Mailbox -Arbitration | where {$_.PersistedCapabilities -like "*OAB*"} | Format-List Name,ServerName,PersistedCapabilities,Database

Storing the OAB files in a dedicated Organization Mailbox (e.g. OABGen) makes the OAB files more resilient. You can change the Arbitration Mailbox for an OAB at any time as long as the corresponding OAB has an ExchangeVersion property value of at least 0.20 (15.0.0.0):

Set-OfflineAddressBook -Identity "OAB" -GeneratingMailbox "OABGen"

Error:

GeneratingMailbox can only be set on an Exchange 2012 or newer OAB.

Exchange 2010 OABs have an ExchangeVersion value of 0.10 (14.0.100.0), whereas an Exchange 2016 OAB has a value of 0.20 (15.0.0.0). Legacy OABs cannot be assigned an Organization Mailbox.

Custom OABs:
As of a multi tenancy hosting configuration with Exchange 2016 and its subsequent requirement of Address Book segregation I once had to implement a couple of custom built OABs. The goal is to host multiple groups of people (i.e. customers) within the same Active Directory and Exchange Organization and give them their own address book environment. It is important that these customer groups don’t see each others address lists because they might contain sensitive information.

To get a list of all OABs run the following command:

Get-OfflineAddressBook | Format-List Name,GUID,GeneratingMailbox

To create new OABs based on your existing OABs run the following command which adds a subsequent 2016 to the OAB’s Name property and retains the corresponding Address Lists used to populate the OAB in the AddressLists property:

ForEach ($i in (Get-OfflineAddressBook -Server <FQDN Exchange 2010 Server>)) {$name = $i.name+" 2016"; New-OfflineAddressBook -Name $name -AddressLists $i.AddressLists}
Get-OfflineAddressBook *2016* | fl Name,ExchangeVersion,GeneratingMailbox

Verify newly created Exchange 2016 OABs with ExchangeVersion property of 0.20 (15.0.0.0)

Get-OfflineAddressBook *2016* | fl Name,ExchangeVersion,Generating*

Now you can remove legacy OABs from Exchange 2010 (consider Address Book Policy dependencies, which need to be adjusted prior to removing legacy OABs!)

Get-OfflineAddressBook -Server <FQDN Exchange 2010 Server> | Remove-OfflineAddressBook

By browsing to https://<FQDN>/oab/<OAB GUID>/oab.xml to the OAB from the clients using IE and not get any cert or IIS errors, The FQDN value depends on what’s configured for the OAB internal/external URLs:

The OAB GUID can be retrieved by issuing the following command:

Get-OfflineAddressBook *Default* | fl Name,Guid

Move-OfflineAddressBook:

As per Microsoft:
Use the Move-OfflineAddressBook cmdlet to designate a new server responsible for generating the offline address book (OAB) in Exchange Server 2010. This cmdlet isn’t used on OABs in Exchange Server 2016 or Exchange Server 2013. To perform this task in Exchange 2016 or Exchange 2013, use the Set-OfflineAddressBook cmdlet with the GeneratingMailbox parameter.

Get-OfflineAddressBook *OAB* | Move-OfflineAddressBook -Server serv-mail.domain.local

Error:

You can’t move a previous version of an Exchange Offline Address Book to Exchange 2013. To create a new OAB for Exchange 2013, please use the New-OfflineAddressBook cmdlet.

Exchange 2010 OABs have an ExchangeVersion value of 0.10 (14.0.100.0), whereas an Exchange 2016 OAB has a value of 0.20 (15.0.0.0). Legacy OABs cannot be updated using Move-OfflineAddressBook anymore. They need to be newly created instead.

After all adjustments have been completed you can update your OABs by running:

Get-OfflineAddressBook -ResultSize Unlimited | Update-OfflineAddressBook

Furthermore you should ensure that each and every database has an OAB assigned in order to avoid mailbox users on the databases without OfflineAddressBook set re-downloading the entire OAB. This can be performed with:

Get-MailboxDatabase | Set-MailboxDatabase -OfflineAddressBook "<Name Of Your Default OAB>"

Further reading:


4. Address Book Policies

As of a multi tenancy hosting configuration with Exchange 2016 and its subsequent requirement of Address Book segregation I once had to implement a couple of custom built OABs as well as Address Book Policies. The goal is to host multiple groups of people (i.e. customers) within the same Active Directory and Exchange Organization and give them their own address book environment. It is important that these customer groups don’t see each others address lists because they might contain sensitive information. The recommended approach defined by Microsoft:

  • Address book policy objects are the only supported solution to ensure an authenticated user can access only their own tenant’s GAL, OAB and address list objects.
  • One or more ABP objects can be created per tenant and assigned to the users as they are provisioned.
  • ABPs can be used to control GAL, OAB and address list object access for clients that client accesses Exchange with an Outlook client (Windows or Mac), EWS application, a mobile device or OWA.
  • Having both ACLs and ABPs are only supported for the length of a migration from one to the other.

Prepare a corresponding CSV file with required property information, e.g. Name and OfflineAddressBook

Run the following command in order to assign the newly created Exchange 2016 OABs to your existing ABPs (assuming you have an appropriate naming convention in place that allows for easy adjusting), and verify whether all ABPs have the corresponding OAB successfully assigned:

Import-Csv .\ABP.csv | forEach {Set-AddressBookPolicy -Identity $_.Name -OfflineAddressBook $_.OfflineAddressBook}
Get-AddressBookPolicy | ft Name,OfflineAddressBook -AutoSize

Further reading:


5. Global Address Lists

GALs don’t need any special consideration in terms of Exchange migration as they are part of the Exchange attributes in Active Directory. When you migrate by way of installing Exchange 2016 on a new system within your existing legacy Exchange environment, Exchange 2016 recognizes the same Exchange attributes in Active Directory.

You can verify this by using ADSIEdit.msc and navigating to CN=Microsoft Exchange,CN=Services,CN=Configuration,DC=DOMAIN,DC=local. Open this node’s Properties and check the value of attributes globalAddressList and globalAddressList2 that contain all the GALs being present in your Exchange environment and thus can be seen and used by any Exchange server wihtin your Exchange organization:

Furthermore they exist a couple of containers representing your GALs which are stored in CN=All Global Address Lists,CN=Address Lists Container,CN=<Organization Name>,CN=Microsoft Exchange,CN=Services,CN=Configuration,DC=DOMAIN,DC=local:

Further reading:


6. Address Lists

The same goes for ALs as they don’t need any special consideration in terms of Exchange migration as they are part of the Exchange attributes in Active Directory, too. When you migrate by way of installing Exchange 2016 on a new system within your existing legacy Exchange environment, Exchange 2016 recognizes the same Exchange attributes in Active Directory.

You can verify this by using ADSIEdit.msc and navigating to CN=All Address Lists,CN=Address Lists Container,CN=<Organization Name>,CN=Microsoft Exchange,CN=Services,CN=Configuration,DC=DOMAIN,DC=local:

Get-AddressList -ResultSize Unlimited | Update-AddressList

Further reading:


7. IIS Log Analysis

Client Access servers can be removed when they are no longer serving any client requests. You can verify that no more traffic is hitting the Client Access server by reviewing the IIS logs on the server. Note that you will likely see continued hits in the logs from the Exchange 2016 servers themselves, or from any connections to the /PowerShell virtual directory by administrators. You can use Log Parser to determine which users (if any) are still making connections to the server.

For example:

logparser.exe "select Count(cs-username) as Count, cs-username as Username from 'C:\inetpub\logs\logfiles\w3svc1\*.*' group by Username order by Count(Username)" -i:IISW3C

Just be aware that querying a wildcard like ‘C:3svc1*.*’ will return results from any log file in that directory, which may be months or even years worth of log data. You can refine the search by removing older log files from the directory C:\inetpub\logs\LogFiles\W3SVC1:


8. Send Connectors

Note the configuration and settings of any Send Connector you’ve configured on your Exchange 2010 environment in order successfully replicate its settings to the corresponding Exchange 2016 Send Connector and keep your mail flow up. 

Every Send Connector has a HomeMtaServerId Property that usually refers to your legacy Exchange 2010 server and needs adjusting, as well as the SourceTransportServers Property. To get the current Send Connector settings run the following command:

Get-SendConnector | fl Name,*Server*

To adjust both HomeMtaServerId and SourceTransportServers with your current Exchange 2016 server, run the following command:

Get-SendConnector | Set-SendConnector -SourceTransportServers "<ServerName>"


9. Receive Connectors

Note the configuration and settings of any Receive Connector you’ve configured on your Exchange 2010 environment in order successfully replicate its settings to the corresponding Exchange 2016 Receive Connector and keep your mail flow up.


10. Update Internal DNS Records

What you should have done almost right after you’ve installed your first Exchange 2016 within your existing legacy Exchange organization is to update your internal DNS records to point to Exchange 2016, i.e. mail.domain.com and autodiscover.domain.com. (or in case you have a Load Balancer in place adjust the corresponding settings there in order to redirect traffic accordingly). As of now, your current DNS records will be pointing to your Exchange 2010 server. Update the records to point to Exchange 2016 server for web traffic and mail flow.

For ease of administration you could configure all of your devices that use Exchange for messaging purposes, e.g. sending alert and/or monitoring mails right through a dedicated Receive Connector, with a common FQDN mail.domain.com, thus relieving you from having to adjust those systems after every migration and/or change in server name or IP address, as you only need to adjust the corresponding DNS record in your DNS zone.

Furthermore ensure updating your Autodiscover SRV record as well, e.g. _autodiscover._tcp.domain.com.

In your DNS zone editor add a SRV record with the following settings:

  • Service: _autodiscover
  • Protocol: _tcp
  • Name: Enter one of the following values:
    • Enter @ if your registered domain is your cloud-based domain. For example, if your registered domain is contoso.com and your cloud-based domain is contoso.com, enter @.
    • Enter the subdomain name if your cloud-based domain is a subdomain of your registered domain. For example, if your registered domain is contoso.com, but your cloud-based domain is the subdomain test.contoso.com, enter test.
  • Priority: 10 (or as per your design)
  • Weight: 10 (or as per your design)
  • Port: 443
  • Target: mail.domain.com
  • TTL: Verify that an appropriate TTL is selected, 1 hour is a common default. (If you are approaching a migration, this should be decremented to allow for quicker cutover)

Verify Exchange Autodiscover SRV Record using nslookup:

nslookup -q=srv _autodiscover._tcp.domain.com

Once internal access is verified and everything is working as expected, update the external HTTPS publishing which for instance can be done via a NAT rule for TCP port 443 configured on a firewall. Send the traffic to Exchange 2016 (or a Load Balancer where applicable) instead of Exchange 2010 server.

In the end you should have something like this:

Exchange 2016 External DNS Records

FQDNRecord TypeValueTTL
domain.comMXmail.domain.com10mins
mail.domain.comAPublic IP Address of your Exchange (either forwarded through a NAT rule or LB)10min
autodiscover.domain.comAPublic IP Address of your Exchange (either forwarded through a NAT rule or LB)10min

Exchange 2016 Internal DNS Records

FQDNRecord TypeValueTTL
mail.domain.comCNAMEExchange2016.domain.local or LB FQDN10mins
autodiscover.domain.comA RecordsInternal IP Adress of your Exchange 2016 Server or LB IP Address10mins
_autodiscover._tcp.domain.comSRV RecordsInternal IP Adress of your Exchange 2016 Server or LB IP Address10mins

Further reading:


Exchange Migration Sources:

The post Exchange 2016 Migration – Finishing Touches – Post Migration Tasks appeared first on blog - Alexander Ollischer | Citrix | Microsoft.

Exchange 2016 – Setup fails with error “Service ‘MpsSvc’ failed to reach status ‘Running’ on this server”

$
0
0

Just recently I ran into an error during initial setup of Exchange 2016 on a newly installed Windows Server 2012 R2 stating: “Service ‘MpsSvc’ failed to reach status ‘Running’ on this server“. Further down the troubleshooting road I found out that this quite common error of not being able to start the Windows Firewall service is not Exchange Server specific.

Symptoms

During initial setup the installation seems to freeze at 25% of running the Readiness Checks and Configuring Prerequisites:

Setup seems to take ages while staying at 25% progress. A look into the corresponding ExchangeSetup.log (which can be found in C:\ExchangeSetupLogs) reveals, that Setup is trying to start the Windows Firewall service (MpsSvc) and failes to do so. The ExchangeSetup.log states:

[01.09.2018 13:22:39.0123] [2] Active Directory session settings for ‘start-SetupService’ are: View Entire Forest: ‘True’, Configuration Domain Controller: ‘NBG-DC-12.ctlm.de’, Preferred Global Catalog: ‘NBG-DC-12.ctlm.de’, Preferred Domain Controllers: ‘{ NBG-DC-12.ctlm.de }’

[01.09.2018 13:22:39.0123] [2] User specified parameters: -ServiceName:’MpsSvc’
[01.09.2018 13:22:39.0123] [2] Beginning processing Start-SetupService
[01.09.2018 13:22:39.0123] [2] [WARNING] Service checkpoint has not progressed. Previous checkpoint=’0′- Current checkpoint=’0′.
[01.09.2018 13:22:39.0138] [2] Previous service status query time is ‘09.01.2018 14:22:39’.
[01.09.2018 13:22:39.0138] [2] Current service status query time is ‘09.01.2018 14:22:39’.
[01.09.2018 13:22:39.0138] [2] Will wait ‘2000’ milliseconds for the service ‘MpsSvc’ to reach status ‘Running’.
[01.09.2018 13:22:41.0260] [2] Service ‘MpsSvc’ failed to reach status ‘Running’ on this server after waiting for ‘2000’ milliseconds.
[01.09.2018 13:22:41.0260] [2] [WARNING] Service checkpoint has not progressed. Previous checkpoint=’0′- Current checkpoint=’0′.
[01.09.2018 13:22:41.0260] [2] Previous service status query time is ‘09.01.2018 14:22:39’.
[01.09.2018 13:22:41.0260] [2] Current service status query time is ‘09.01.2018 14:22:41’.
[01.09.2018 13:22:41.0260] [2] Will wait ‘25000’ milliseconds for the service ‘MpsSvc’ to reach status ‘Running’.
[01.09.2018 13:23:06.0494] [2] Service ‘MpsSvc’ failed to reach status ‘Running’ on this server after waiting for ‘25000’ milliseconds.
[01.09.2018 13:23:06.0494] [2] [WARNING] Service checkpoint has not progressed. Previous checkpoint=’0′- Current checkpoint=’0′.
[01.09.2018 13:23:06.0494] [2] Previous service status query time is ‘09.01.2018 14:22:41’.
[01.09.2018 13:23:06.0494] [2] Current service status query time is ‘09.01.2018 14:23:06’.
[01.09.2018 13:23:06.0494] [2] Will wait ‘25000’ milliseconds for the service ‘MpsSvc’ to reach status ‘Running’.

Setup is trying to start the Windows Firewall service for quite some time until it finally gives in and throws the following error message:

Error:
The following error was generated when “$error.Clear();
if (Get-Service MpsSvc* | ?{$_.Name -eq ‘MpsSvc’})
{
Set-Service MpsSvc -StartupType Automatic
Start-SetupService -ServiceName MpsSvc
}
” was run: “Microsoft.Exchange.Configuration.Tasks.ServiceDidNotReachStatusException: Service ‘MpsSvc’ failed to reach status ‘Running’ on this server.
at Microsoft.Exchange.Configuration.Tasks.Task.ThrowError(Exception exception, ErrorCategory errorCategory, Object target, String helpUrl)
at Microsoft.Exchange.Configuration.Tasks.Task.WriteError(Exception exception, ErrorCategory category, Object target)
at Microsoft.Exchange.Management.Tasks.ManageSetupService.WaitForServiceStatus(ServiceController serviceController, ServiceControllerStatus status, Unlimited1 maximumWaitTime, Boolean ignoreFailures, Boolean sendWatsonReportForHungService)
at Microsoft.Exchange.Management.Tasks.ManageSetupService.StartService(ServiceController serviceController, Boolean ignoreServiceStartTimeout, Boolean failIfServiceNotInstalled, Unlimited
1 maximumWaitTime, String[] serviceParameters)
at Microsoft.Exchange.Management.Tasks.ManageSetupService.StartService(String serviceName, Boolean ignoreServiceStartTimeout, Boolean failIfServiceNotInstalled, Unlimited`1 maximumWaitTime, String[] serviceParameters)
at Microsoft.Exchange.Management.Tasks.StartSetupService.InternalProcessRecord()
at Microsoft.Exchange.Configuration.Tasks.Task.<ProcessRecord>b__91_1()
at Microsoft.Exchange.Configuration.Tasks.Task.InvokeRetryableFunc(String funcName, Action func, Boolean terminatePipelineIfFailed)”.

Troubleshooting

Trying to manually start the Windows Firewall service within the Services MMC failes with the following error:

Windows could not start the Windows Firewall on Local Computer. For more information, review the System Event Log. If this is a non-Microsoft service, contact the service vendor, an refer to service-specific error code 5.

An Event entry with ID 7024 is logged once more.

The System Event Log shows an Event ID 7024, Source: Service Control Manager:

The Windows Firewall service terminated with the following service-specific error:
Access is denied.

Someone suggested opening  a command prompt and executing sc sdshow MpsSvc , which shows:

D:(A;;CCLCSWRPWPDTLOCRRC;;;SY)(A;;CCDCLCSWRPWPDTLOCRSDRCWDWO;;;BA)(A;;CCLCSWLOCRRC;;;IU)(A;;CCLCSWLOCRRC;;;SU)(A;;CCLCRP;;;S-1-5-80-2006800713-1441093265-249754844-3404434343-1444102779)S:(AU;FA;CCDCLCSWRPWPDTLOCRSDRCWDWO;;;WD)

Well, quite cryptic and not really helpful, at least for me in the first place. I tried to compare it to working Windows Server 2012 R2 servers, but to no prevail. More information on how to interpret, verify, build your own security subscriptors and set permissions on Windows services via command line can be found here:

To make a long story short: missing or wrong permissions on either Registry and/or Windows Services are not the issue here. 

Solution

Searching the Internet I came across this Microsoft TechCommunity’s thread, mentioning something in terms of setting up Exchange 2016 on a Windows Server Insider Build:

Exchange 2016 requires the full installation of Windows Server (in 2016, it’s called Desktop Experience), and isn’t explictly supported for installation on Server Core.

Alas, finally that rang some bells as I previously struggled with enabling all required Windows Features in order to install Exchange 2016 on a Windows Server 2012 R2, in particular:

  • Desktop Experience
  • Ink and Handwriting Services
  • Media Foundation

Issues posed by the TrustedInstaller service prohibited an successful installation of the aforementioned Windows Features, always reverting to the previous state of my Windows Features set upon reboot:

The Desktop-Experience Windows Feature simpy refused to stay installed:

Due to some Windows Server hardening settings applied via GPO in the affected domain, TrustedInstaller had some issues. I had to install Desktop Experience on a step-by-step basis while disabling the TrustedInstaller service temporarily (as removing the GPO responsible in the first place was not an option). Details on this procedure can be found here and here:

  1. Add-WindowsFeature InkAndHandwritingServices
  2. Reboot
  3. Add-WindowsFeature Server-Media-Foundation
  4. Reboot
  5. Add-WindowsFeature Desktop-Experience
  6. Set-Service -name TrustedInstaller -startupType Disabled
  7. Reboot

Verify that all required Windows Features are still installed:

  1. Get-WindowsFeature InkAndHandwritingServices
  2. Get-WindowsFeature Server-Media-Foundation
  3. Get-WindowsFeature Desktop-Experience
  4. Set-Service -name TrustedInstaller -startupType Automatic
  5. Reboot

Quite tedious, but it seemed to work.

Verdict

After having successfully installed all the required Windows Features, in particular Desktop-Experience, I was able to start the Windows Firewall service and install Exchange 2016 as well. Somewhere, somehow, there seems to be some kind of dependency between those two components. I did some further searching and came up with this thread in the Microsoft TechNet Forums, and it looks like there actually is a connection! This is strange as it never happened before with any of my previous Exchange installations. And even more strange is the fact, that I always disable the Windows Firewall service prior to installing Exchange Server, and it never posed a problem. Seems like Exchange Setup enables and starts the Windows Firewall service on its own accord and does its magic silently in the background. Strange as there even are some articles out there that actually recommend disabling the Windows Firewall service as well as articles stating quite the opposite, especially Paul Cunningham’s own Beware of Bad Advice About Exchange Servers and Windows Firewall. A proposed solution (and not tested by myself) in that case could be:

We’ve seen the similar symptons. Please try manually create the following registry key, and then test to see if Windows Firewall can be started.

HKEY_LOCAL_MACHINE\SYSTEM\CurrentControlSet\Services\MpsSvc\Parameters\ACService

Further reading:

The post Exchange 2016 – Setup fails with error “Service ‘MpsSvc’ failed to reach status ‘Running’ on this server” appeared first on blog - Alexander Ollischer | Citrix | Microsoft.


Exchange 2016 – HTTP Error 500 after logging into ECP/OWA

$
0
0

After logging into Exchange 2016’s ECP you receive an HTTP Error 500 (same goes with OWA):

06-12-_2016_12-23-00

Searching the internet ends up with several possible solutions to this issue, ranging from missing System Attendant Mailboxes, to bogus ADSI settings regarding the Exchange CAS Service. I tried several of them to no prevail.

And it doesn’t matter whether you enter DOMAIN\Administrator or administrator@domain.local for your username. In most cases the simplest solution is to execute UpdateCas.ps1 PowerShell script located in the C:\Program Files\Microsoft\Exchange Server\V15\Bin folder, followed by an IISReset:

06-12-_2016_13-58-01 

Once there was a case where UpdateCas.ps1 didn’t work, which left me with executing the following PowerShell cmdlets, in subsequent order:

Get-OwaVirtualDirectory | Set-OwaVirtualDirectory -FormsAuthentication $False -BasicAuthentication $True
Get-OwaVirtualDirectory | Set-OwaVirtualDirectory -FormsAuthentication $True -BasicAuthentication $True
Get-EcpVirtualDirectory | Set-EcpVirtualDirectory -FormsAuthentication $false -BasicAuthentication $true
Get-EcpVirtualDirectory | Set-EcpVirtualDirectory -FormsAuthentication $true -BasicAuthentication $true
iisreset

Again, one Exchange 2016 Server in particular was immune against all those tricks and needed the following adjustments:

Get-EcpVirtualDirectory | Set-EcpVirtualDirectory -FormsAuthentication $false -BasicAuthentication $true -WindowsAuthentication $true
Get-OWAVirtualDirectory | Set-OWAVirtualDirectory -FormsAuthentication $false -BasicAuthentication $true -WindowsAuthentication $true
iisreset
Recycle MSExchangeECPAppPool
Recycle MSExchangeOWAAppPool

Keep in mind that Authentication Settings for both Virtual Directories ECP and OWA must be identical:

14-12-_2016_10-55-35

After that I was able to successfully log into ECP and OWA again.

Update 2016-12-15

On another occassion it turned out that the Mailbox Database the user tried to access via OWA was actually unmounted. The Event Log showed a lot of Event IDs 1023, Event Source: MSExchange ActiveSync, with the following Event Message:

Exchange ActiveSync tried to access a mailbox on Mailbox server “yourserver.domain.local”. It could not access the mailbox because the Mailbox server is offline.

15-12-_2016_10-03-12

After mounting the corresponding Mailbox Database everything worked as expected. By coincidence the Administrator’s Mailbox was hosted on the exact same Mailbox Database, thus rendering the Administrator account unable to log into ECP and OWA, neither, resulting in http error 500.

Further reading:

The post Exchange 2016 – HTTP Error 500 after logging into ECP/OWA appeared first on blog - Alexander Ollischer | Citrix | Microsoft.

Citrix NetScaler v11 – How to setup your NetScaler as an RDS RD Gateway

$
0
0

If you want to use your NetScaler for all things that need to be accessible from the outside, over a single IP address, that poses an issue. As is usually a problem with small to medium sized businesses which only have one public IP address at their disposal, and need to implement features like a fully functional RDS environment (with RD Web Access, RD Gateway, etc), a XenApp/XenDesktop evnironment with StoreFront, and even AD FS, say, for Office365. Generally all these services require port 443 (https) to be fully functional, and you can only set up one distinctive IP address on your NetScaler providing this service, pointing it to your internal resources via Firewall rules, thus leaving you with only one option: NetScaler’s Unified Gateway and Content Switching features. 

In this case keep in mind that we’re not talking about NetScaler’s native RDP Proxy feature as described by Carl Stalhood in his article here. Instead we’re utilizing Content Switching and Unified Gateway features in order to use NetScaler as a frontend for your RDS Gateway and RDWeb, and pass traffic through NetScaler to your internal network, thus allowing you to successfully establish RDP sessions to Published Remote Apps from external networks with NetScaler.

Again, courtesy of Trond Eirik Haavarstein and Dave Brett, without whom this article wouldn’t have been possible in the first place!

This article can be considered a continuation of my previous article Citrix NetScaler v11 – How to setup your NetScaler as an AD FS proxy , and is partly based on requirements and configuration steps described there.

I verified and tested all these settings with Windows Server 2012 R2, a public Server Certificate issued by StartCom, and NetScaler v11.1 48.10nc.

Requirements on the Microsoft side of things

  1. a fully working and functional RD Gateway and RDWeb deployment,
  2. with corresponding Server Certificate in place,
  3. and a secondary IP address and corresponding binding in IIS with SNI enabled (in my case for AD FS and RDWeb, respectively),
  4. adjust my RDPublishedName via Set-RDPublishedName.ps1 script.

Requirements on NetScaler

  1. as well as NetScaler SNI Feature enabled,
  2. RDP Load Balancing vServer (Port 3389),
  3. internal and external DNS Records adjusted accordingly.

In order to successfully get RDS up and running on my existing AD FS server I did the following:

  • added a second IPv4 address to the server to represent each https service seperately, i.e. 10.0.0.221 for AD FS, and 10.0.0.220 for RDS, respectively:
    24-11-_2016_08-24-12
  • enabled IIS SNI support on my Default Web Site by adding corresponding Server Certificates to Site Bindings:
    24-11-_2016_08-31-07 24-11-_2016_08-31-50
  • configured IIS Site Bindings for my Default Web Site to use those IPv4 addresses, i.e. 10.0.0.221 for AD FS, and 10.0.0.220 for RDS, respectively:
    24-11-_2016_08-25-38
  • configured my RDS Deployment Properties to represent the Server Certificate’s FQDN as Server Name and selected the corresponding Server Certificate for its Role Services:
    • RD Connection Broker – Enable Single Sign On
    • RD Connection Broker – Publishing
    • RD Web Access
    • RD Gateway
      24-11-_2016_08-33-24 24-11-_2016_08-34-00
  • adjusted my RDS Server Properties within RD Gateway Manager console to use the corresponding Server Certificate representing my deployment’s public FQDN (SSL Certificate tab):
    24-11-_2016_08-35-45
  • enabled UDP Transport in my RDS Server Properties (Transport Settings tab):
    24-11-_2016_08-48-32
  • and adjusted my RDPublishedName via Set-RDPublishedName.ps1 script:
    24-11-_2016_08-54-51
  • in the end I verified that both my AD FS and RDWeb deployments still worked by navigating to the corresponding URLs:
    • AD FS: https://adfs.domain.com/adfs/fs/federationserverservice.asmx
    • RDWeb: https://rdweb.domain.com/rdweb
      24-11-_2016_09-03-14 24-11-_2016_09-01-28

NetScaler CLI Commands

You have to manually replace the following with your corresponding information:

  • 10.0.0.220 with IP address of your internal RD Gateway server
  • rdweb.domain.com with the FQDN of your external DNS A-Record (read: Subject Alternative Name)
  • YourCertName with the Display Name of your Server Certificate

add server rdgw 10.0.0.220
add serviceGroup svcgrp_rdgw_https SSL -maxClient 0 -maxReq 0 -cip DISABLED -usip NO -useproxyport YES -cltTimeout 180 -svrTimeout 360 -CKA NO -TCPB NO -CMP NO
add lb vserver vip_rdgw_https SSL 0.0.0.0 0 -persistenceType SOURCEIP -timeout 5 -cltTimeout 180
add cs action act_rdgw -targetLBVserver vip_rdgw_https
add cs policy rdgw -rule "HTTP.REQ.HOSTNAME.CONTAINS(\"rdweb.domain.com\")" -action act_rdgw
bind lb vserver vip_rdgw_https svcgrp_rdgw_https
bind cs vserver unified -policyName rdgw -priority 80
bind serviceGroup svcgrp_rdgw_https rdgw 443
set ssl vserver vip_rdgw_https -SNIEnable ENABLED
bind ssl serviceGroup svcgrp_rdgw_https -certkeyName YourCertName
bind ssl vserver vip_rdgw_https -certkeyName YourCertName
save ns config

Furthermore you might have to add the following Content Switching configuration according to Jakob Rutski‘s blog article Load Balancing Remote Desktop Gateway with Citrix NetScaler Part 2:

Name: CSW-RDG-Mobile
Action: CSW-RDG-Action
Expression: HTTP.REQ.HEADER(“User-Agent”).CONTAINS(“MSRPC”)

Verify that everything’s working as expected:

 18-11-_2016_10-48-03

18-11-_2016_10-56-16

18-11-_2016_10-57-24

18-11-_2016_10-58-19

Finally, you could navigate to your newly added RDWeb URL (e.g. https://rdweb.domain.com/RDWeb) and check whether it’s working properly, i.e. you can initiate an RDP session and successfully launch a published RemoteApp:

18-11-_2016_11-01-41

18-11-_2016_11-02-15

Further reading:

The post Citrix NetScaler v11 – How to setup your NetScaler as an RDS RD Gateway appeared first on blog - Alexander Ollischer | Citrix | Microsoft.

Citrix XenDesktop 7.x – Query Citrix Receiver Versions connecting to your environment – XLS Report

$
0
0

Just recently I was tasked to identify all Citrix Receiver Versions connecting to a Citrix XenDesktop 7.x environment.

For starters, to get information on current sessions issue the following PowerShell cmdlets on your Citrix Broker Server:

Add-PSSnapin *Citrix*
Get-BrokerSession | Select MachineName,UserName,ClientPlatform,ClientVersion,*Protocol* | Out-GridView

14-12-_2016_14-00-00

To get hands on every single information of your current Broker Sessions simply run:

Get-BrokerSession | Out-GridView

Now, in terms of historical session and connection information you have to query the OData API (http://<ServerBrokerFQDN>/Citrix/Monitor/OData/v2/Data), as with the Get-BrokerSession cmdlet you only get information on current sessions. So in case you’re looking for historical reports and data, which you cannot find in the Director Web UI, you could simply create a custom report with Microsoft Excel by connecting to the Data Feed.

This leaves me with recommending the following Citrix Blog Article, that explains how to

  • connect and read the available OData Data Feed from your Citrix Broker Server,
  • read the content of the Connection table and import it into an Excel Sheet,
  • limit the data’s timeframe we’re looking at,
  • add a PivotChart, and
  • filter the required data.

The result might look something like this:

14-12-_2016_14-48-30

You can then tinker with the different tables available through the Data Feed in order to achieve the resultant data set required for your purpose. As opposed to the aforementioned Citrix Blog you could select the following tables to even get information on Citrix Receiver Versions, Client Names, and corresponding User Names:

  • Connection
  • Session
  • User

Just have a look at the underlying SQL DB and its Database Diagram in order to reveal the tables’ relationships:

Relationship NameTable NameTables SpecificationColumns Specifiation
Session_UserSessionsForeign Key ColumnUserId
UsersPrimary Key ColumnId
Connection_SessionForeign Key ColumnSessionKey
Primary Key ColumnSessionKey
Session_CurrentConnectionConnectionsForeign Key ColumnCurrentConnectionId
SessionsPrimary Key ColumnId

14-12-_2016_15-23-07

Then you should be able to rebuild these relationships within Microsoft Excel and get the resultant set of data including corresponding user names:

Otherwise you could create a corresponding View directly within SQL Server Management Studio on the server hosting your XenDesktop SQL Monitoring database. I created one and called it v_ReceiverVersions, thus allowing me to access the data through Excel as well. The custom View includes the aforementioned tables

  • Connection (MonitorData)
  • Session (MonitorData)
  • User (MonitorData)

SELECT MonitorData.Connection.ClientName, MonitorData.Connection.ClientVersion, MonitorData.Connection.BrokeringDate, MonitorData.[User].Upn
FROM MonitorData.Connection INNER JOIN
MonitorData.Session ON MonitorData.Connection.SessionKey = MonitorData.Session.SessionKey AND
MonitorData.Connection.Id = MonitorData.Session.CurrentConnectionId INNER JOIN
MonitorData.[User] ON MonitorData.Session.UserId = MonitorData.[User].Id

This setup allows me to filter the available data (i.e. set to the required period in time by utilizing the BrokeringDate) by either choosing ClientName, ClientVersion or UPN:

The data available in Citrix Director is dependent on your Citrix License, which in turn determines your usage data retention within Citrix Director. As per Citrix:

  • All editions: Director – real-time monitoring and basic troubleshooting (up to 7 days of data)
  • XD7 Platinum: EdgeSight performance management feature – includes #1 + historical monitoring (up to a full year of data through the monitoring SQL database)
  • XD7 Platinum + NetScaler Enterprise: EdgeSight performance management and network analysis – includes #2 plus 60 mins. of network data
  • XD7 Platinum + NetScaler Platinum: EdgeSight performance management and network analysis – includes #2 plus unlimited network data

Further reading:

The post Citrix XenDesktop 7.x – Query Citrix Receiver Versions connecting to your environment – XLS Report appeared first on blog - Alexander Ollischer | Citrix | Microsoft.

Exchange 2016 Migration – Finishing Touches – Post Migration Tasks

$
0
0

As I did quite some Exchange migrations (including single as well as multi tenancy environments) I was always wondering whether there are any additional post migration tasks that need to be addressed before you start removing your legacy Exchange server(s) from your organization. For instance, as with migrating from Exchange 2003 to, say, Exchange 2010 you had to update Global Address Lists, Address Lists, Offline Address Books, et al to the new Exchange 2010 version by executing the corresponding cmdlts, e.g. Move-OfflineAddressBook. Now when migrating from Exchange 2010 to Exchange 2016 (or even just from Exchange 2013 to Exchange 2016 with both having an almost identical architecture) what remains of those post migration tasks? Which ones are a necessity? What kind of architectural changes require you to think different and adjust certain settings prior to removing your legacy Exchange server(s)?

By talking about post migration tasks, what do I mean? Well, after you’ve successfully migrated all your databases, mailboxes, public folders, send/receive connectors, et al, what’s still left? Maybe the not so obvious parts of your Exchange infrastructure that need addressing as well in order to avoid any unwanted behaviors and/or errors after you removed the last legacy Exchange server from your organization.

The following article is a concentrated and (hopefully) comprehensive set of information collected from various sources. I’m not reinventing the wheel here, just trying to consolidate every kind of post migration task that deems necessary for a successful Exchange 2016 migration. Pls feel free to comment whether this all still is reasonable and required.

The article consists of the following topics:

  1. System/Arbitration Mailboxes
  2. Distribution Groups
  3. Offline Address Books
  4. Address Book Policies
  5. Global Address Lists
  6. Address Lists
  7. IIS Log Analysis
  8. Send Connectors
  9. Receive Connectors
  10. Update Internal DNS Records

1. System/Arbitration Mailboxes

Before any production services are cut over to Exchange 2016 it is imperative to move the arbitration mailboxes. Arbitration mailboxes are system mailboxes used to store organization-wide data, e.g. administrator audit logs, metadata for eDiscovery searches, and Unified Messaging data. They need to be hosted on the highest version of Exchange in the organization. The mailboxes themselves are typically quite small and will move fairly quickly.

Run the following command to move the mailboxes to a database on your Exchange 2016 server:

Get-Mailbox -Arbitration | New-MoveRequest -BatchName "Arbitration" -TargetDatabase <NameOfTargetDB>

Verify that you’ve successfully migrated all of your abritration mailboxes to an Exchange 2016 database by running:

Get-Mailbox -Arbitration | ft Name, DisplayName, Database -AutoSize

Further reading:


2. Distribution Groups

For each message that is sent to a distribution group, Exchange must access the full membership list to route the message to all recipients. Expansion servers route messages that are sent to a single distribution list or group for each of the recipient objects in that list or group. When a user sends a message to a group, the Exchange server that is acting as the expansion server expands the group to its individual members. This expansion permits members of the distribution list or group to receive the message. An expansion server also resolves the names of all recipients in the distribution list or group, and then determines the most efficient path for routing the message.

Get-DistributionGroup -ResultSize Unlimited | Set-DistributionGroup -ExpansionServer SERV-MAIL.domain.local

Furthermore upgrading distribution groups from Exchange 2007 to Exchange 2016 has 3 steps:

  • Distribution groups must be upgraded
  • Distribution group owners must be set, and
  • the homeMTA property needs to be cleared.  

The following powershell code will set things straight (courtesy of Cooper):

#Forces Upgrade of all distribution groups
Get-DistributionGroup –resultsize unlimited | Set-DistributionGroup –ForceUpgrade
#Set All Distribution Group Owners (Required for Exchange 2010/2013 if missing causes errors)
#Change the owners to the desired domain accounts replace USER@DOMAIN.COM
Get-DistributionGroup -ResultSize Unlimited | Set-DistributionGroup -BypassSecurityGroupManagerCheck -ManagedBy 'USER@DOMAIN.COM’,’USER2@DOMAIN.COM’
#Clear homeMTA property for a single distribution group (If any distribution groups have this property set it can force a specific server to send distribution group messages)
Get-DistributionGroup | ForEach { Set-ADGroup -Identity $_.samAccountName -Clear homeMTA }

Further reading:


3. Offline Address Books

An OAB is used by Microsoft Outlook clients in Cached Exchange Mode for address book lookups when offline. OABs are also critical in reducing the workload on Exchange servers as cached mode Outlook clients will always query the local OAB first.

Remove Legacy Default OAB:
The legacy offline address book can be removed from the organization when there are no more Exchange 2010 mailbox users. Exchange 2016 mailbox users will be using the new Default OAB created by Exchange 2016 setup (easily identifieable by the subsequent (Ex2013) string in the OAB’s name, e.g. Default Offline Address List (Ex2013)). Simply use the Exchange 2010 Management Console (EMC) to do so. You can then adjust the display name of your new Default OAB at any point in time by running:

Set-OfflineAddressBook “Default Offline Address List (Ex2013)” -Name “Default Offline Address List”

OAB Distribution:
Exchange 2007 and 2010 supported two methods of OAB distribution: web distribution and Public Folder distribution. Exchange 2013/2016  supports the web distribution method only.

1st disable Public Folder Distribution:

Get-OfflineAddressBook -ResultSize Unlimited | Set-OfflineAddressBook -PublicFolderDistributionEnabled $false

2nd enable Web Distribution:

Get-OfflineAddressBook | Set-OfflineAddressBook -VirtualDirectories {SERV-MAIL\OAB (Default Web Site)}

OAB and Generating Mailbox:
In Exchange 2016, the OAB is first generated in the Arbitration Mailbox so understanding which database houses this Arbitration Mailbox is key to understanding the server that is currently responsible for generating the OAB. Once generated, the OAB is then later copied as a series of files to the \ClientAccess\OAB folder on each mailbox server.

We need to move the OAB generation to Exchange 2016. It doesn’t matter how many OABs we have in our organization, but we still need at least one (1) mailbox with PersistedCapabilities of OrganizationCapabilityOABGen, and it doesn’t really matter which mailbox we use. We can even set which mailbox generates which OAB.

First of all identify the current Generating Mailbox, i.e. the Organization Mailbox, and note it’s Name, e.g. SystemMailbox{bb558c35-97f1-4cb9-8ff7-d53741dc928c}:

Get-Mailbox -Arbitration | where {$_.PersistedCapabilities -like "*OAB*"} | Format-List Name,ServerName,PersistedCapabilities,Database

Storing the OAB files in a dedicated Organization Mailbox (e.g. OABGen) makes the OAB files more resilient. You can change the Arbitration Mailbox for an OAB at any time as long as the corresponding OAB has an ExchangeVersion property value of at least 0.20 (15.0.0.0):

Set-OfflineAddressBook -Identity "OAB" -GeneratingMailbox "OABGen"

Error:

GeneratingMailbox can only be set on an Exchange 2012 or newer OAB.

Exchange 2010 OABs have an ExchangeVersion value of 0.10 (14.0.100.0), whereas an Exchange 2016 OAB has a value of 0.20 (15.0.0.0). Legacy OABs cannot be assigned an Organization Mailbox.

Custom OABs:
As of a multi tenancy hosting configuration with Exchange 2016 and its subsequent requirement of Address Book segregation I once had to implement a couple of custom built OABs. The goal is to host multiple groups of people (i.e. customers) within the same Active Directory and Exchange Organization and give them their own address book environment. It is important that these customer groups don’t see each others address lists because they might contain sensitive information.

To get a list of all OABs run the following command:

Get-OfflineAddressBook | Format-List Name,GUID,GeneratingMailbox

To create new OABs based on your existing OABs run the following command which adds a subsequent 2016 to the OAB’s Name property and retains the corresponding Address Lists used to populate the OAB in the AddressLists property:

ForEach ($i in (Get-OfflineAddressBook -Server <FQDN Exchange 2010 Server>)) {$name = $i.name+" 2016"; New-OfflineAddressBook -Name $name -AddressLists $i.AddressLists}
Get-OfflineAddressBook *2016* | fl Name,ExchangeVersion,GeneratingMailbox

Verify newly created Exchange 2016 OABs with ExchangeVersion property of 0.20 (15.0.0.0)

Get-OfflineAddressBook *2016* | fl Name,ExchangeVersion,Generating*

Now you can remove legacy OABs from Exchange 2010 (consider Address Book Policy dependencies, which need to be adjusted prior to removing legacy OABs!)

Get-OfflineAddressBook -Server <FQDN Exchange 2010 Server> | Remove-OfflineAddressBook

By browsing to https://<FQDN>/oab/<OAB GUID>/oab.xml to the OAB from the clients using IE and not get any cert or IIS errors, The FQDN value depends on what’s configured for the OAB internal/external URLs:

The OAB GUID can be retrieved by issuing the following command:

Get-OfflineAddressBook *Default* | fl Name,Guid

Move-OfflineAddressBook:

As per Microsoft:
Use the Move-OfflineAddressBook cmdlet to designate a new server responsible for generating the offline address book (OAB) in Exchange Server 2010. This cmdlet isn’t used on OABs in Exchange Server 2016 or Exchange Server 2013. To perform this task in Exchange 2016 or Exchange 2013, use the Set-OfflineAddressBook cmdlet with the GeneratingMailbox parameter.

Get-OfflineAddressBook *OAB* | Move-OfflineAddressBook -Server serv-mail.domain.local

Error:

You can’t move a previous version of an Exchange Offline Address Book to Exchange 2013. To create a new OAB for Exchange 2013, please use the New-OfflineAddressBook cmdlet.

Exchange 2010 OABs have an ExchangeVersion value of 0.10 (14.0.100.0), whereas an Exchange 2016 OAB has a value of 0.20 (15.0.0.0). Legacy OABs cannot be updated using Move-OfflineAddressBook anymore. They need to be newly created instead.

After all adjustments have been completed you can update your OABs by running:

Get-OfflineAddressBook -ResultSize Unlimited | Update-OfflineAddressBook

Furthermore you should ensure that each and every database has an OAB assigned in order to avoid mailbox users on the databases without OfflineAddressBook set re-downloading the entire OAB. This can be performed with:

Get-MailboxDatabase | Set-MailboxDatabase -OfflineAddressBook "<Name Of Your Default OAB>"

Further reading:


4. Address Book Policies

As of a multi tenancy hosting configuration with Exchange 2016 and its subsequent requirement of Address Book segregation I once had to implement a couple of custom built OABs as well as Address Book Policies. The goal is to host multiple groups of people (i.e. customers) within the same Active Directory and Exchange Organization and give them their own address book environment. It is important that these customer groups don’t see each others address lists because they might contain sensitive information. The recommended approach defined by Microsoft:

  • Address book policy objects are the only supported solution to ensure an authenticated user can access only their own tenant’s GAL, OAB and address list objects.
  • One or more ABP objects can be created per tenant and assigned to the users as they are provisioned.
  • ABPs can be used to control GAL, OAB and address list object access for clients that client accesses Exchange with an Outlook client (Windows or Mac), EWS application, a mobile device or OWA.
  • Having both ACLs and ABPs are only supported for the length of a migration from one to the other.

Prepare a corresponding CSV file with required property information, e.g. Name and OfflineAddressBook

Run the following command in order to assign the newly created Exchange 2016 OABs to your existing ABPs (assuming you have an appropriate naming convention in place that allows for easy adjusting), and verify whether all ABPs have the corresponding OAB successfully assigned:

Import-Csv .\ABP.csv | forEach {Set-AddressBookPolicy -Identity $_.Name -OfflineAddressBook $_.OfflineAddressBook}
Get-AddressBookPolicy | ft Name,OfflineAddressBook -AutoSize

Further reading:


5. Global Address Lists

GALs don’t need any special consideration in terms of Exchange migration as they are part of the Exchange attributes in Active Directory. When you migrate by way of installing Exchange 2016 on a new system within your existing legacy Exchange environment, Exchange 2016 recognizes the same Exchange attributes in Active Directory.

You can verify this by using ADSIEdit.msc and navigating to CN=Microsoft Exchange,CN=Services,CN=Configuration,DC=DOMAIN,DC=local. Open this node’s Properties and check the value of attributes globalAddressList and globalAddressList2 that contain all the GALs being present in your Exchange environment and thus can be seen and used by any Exchange server wihtin your Exchange organization:

Furthermore they exist a couple of containers representing your GALs which are stored in CN=All Global Address Lists,CN=Address Lists Container,CN=<Organization Name>,CN=Microsoft Exchange,CN=Services,CN=Configuration,DC=DOMAIN,DC=local:

Further reading:


6. Address Lists

The same goes for ALs as they don’t need any special consideration in terms of Exchange migration as they are part of the Exchange attributes in Active Directory, too. When you migrate by way of installing Exchange 2016 on a new system within your existing legacy Exchange environment, Exchange 2016 recognizes the same Exchange attributes in Active Directory.

You can verify this by using ADSIEdit.msc and navigating to CN=All Address Lists,CN=Address Lists Container,CN=<Organization Name>,CN=Microsoft Exchange,CN=Services,CN=Configuration,DC=DOMAIN,DC=local:

Get-AddressList -ResultSize Unlimited | Update-AddressList

Further reading:


7. IIS Log Analysis

Client Access servers can be removed when they are no longer serving any client requests. You can verify that no more traffic is hitting the Client Access server by reviewing the IIS logs on the server. Note that you will likely see continued hits in the logs from the Exchange 2016 servers themselves, or from any connections to the /PowerShell virtual directory by administrators. You can use Log Parser to determine which users (if any) are still making connections to the server.

For example:

logparser.exe "select Count(cs-username) as Count, cs-username as Username from 'C:\inetpub\logs\logfiles\w3svc1\*.*' group by Username order by Count(Username)" -i:IISW3C

Just be aware that querying a wildcard like ‘C:3svc1*.*’ will return results from any log file in that directory, which may be months or even years worth of log data. You can refine the search by removing older log files from the directory C:\inetpub\logs\LogFiles\W3SVC1:


8. Send Connectors

Note the configuration and settings of any Send Connector you’ve configured on your Exchange 2010 environment in order successfully replicate its settings to the corresponding Exchange 2016 Send Connector and keep your mail flow up. 

Every Send Connector has a HomeMtaServerId Property that usually refers to your legacy Exchange 2010 server and needs adjusting, as well as the SourceTransportServers Property. To get the current Send Connector settings run the following command:

Get-SendConnector | fl Name,*Server*

To adjust both HomeMtaServerId and SourceTransportServers with your current Exchange 2016 server, run the following command:

Get-SendConnector | Set-SendConnector -SourceTransportServers "<ServerName>"


9. Receive Connectors

Note the configuration and settings of any Receive Connector you’ve configured on your Exchange 2010 environment in order successfully replicate its settings to the corresponding Exchange 2016 Receive Connector and keep your mail flow up.


10. Update Internal DNS Records

What you should have done almost right after you’ve installed your first Exchange 2016 within your existing legacy Exchange organization is to update your internal DNS records to point to Exchange 2016, i.e. mail.domain.com and autodiscover.domain.com. (or in case you have a Load Balancer in place adjust the corresponding settings there in order to redirect traffic accordingly). As of now, your current DNS records will be pointing to your Exchange 2010 server. Update the records to point to Exchange 2016 server for web traffic and mail flow.

For ease of administration you could configure all of your devices that use Exchange for messaging purposes, e.g. sending alert and/or monitoring mails right through a dedicated Receive Connector, with a common FQDN mail.domain.com, thus relieving you from having to adjust those systems after every migration and/or change in server name or IP address, as you only need to adjust the corresponding DNS record in your DNS zone.

Furthermore ensure updating your Autodiscover SRV record as well, e.g. _autodiscover._tcp.domain.com.

In your DNS zone editor add a SRV record with the following settings:

  • Service: _autodiscover
  • Protocol: _tcp
  • Name: Enter one of the following values:
    • Enter @ if your registered domain is your cloud-based domain. For example, if your registered domain is contoso.com and your cloud-based domain is contoso.com, enter @.
    • Enter the subdomain name if your cloud-based domain is a subdomain of your registered domain. For example, if your registered domain is contoso.com, but your cloud-based domain is the subdomain test.contoso.com, enter test.
  • Priority: 10 (or as per your design)
  • Weight: 10 (or as per your design)
  • Port: 443
  • Target: mail.domain.com
  • TTL: Verify that an appropriate TTL is selected, 1 hour is a common default. (If you are approaching a migration, this should be decremented to allow for quicker cutover)

Verify Exchange Autodiscover SRV Record using nslookup:

nslookup -q=srv _autodiscover._tcp.domain.com

Once internal access is verified and everything is working as expected, update the external HTTPS publishing which for instance can be done via a NAT rule for TCP port 443 configured on a firewall. Send the traffic to Exchange 2016 (or a Load Balancer where applicable) instead of Exchange 2010 server.

In the end you should have something like this:

Exchange 2016 External DNS Records

FQDNRecord TypeValueTTL
domain.comMXmail.domain.com10mins
mail.domain.comAPublic IP Address of your Exchange (either forwarded through a NAT rule or LB)10min
autodiscover.domain.comAPublic IP Address of your Exchange (either forwarded through a NAT rule or LB)10min

Exchange 2016 Internal DNS Records

FQDNRecord TypeValueTTL
mail.domain.comCNAMEExchange2016.domain.local or LB FQDN10mins
autodiscover.domain.comA RecordsInternal IP Adress of your Exchange 2016 Server or LB IP Address10mins
_autodiscover._tcp.domain.comSRV RecordsInternal IP Adress of your Exchange 2016 Server or LB IP Address10mins

Further reading:


Exchange Migration Sources:

The post Exchange 2016 Migration – Finishing Touches – Post Migration Tasks appeared first on blog - Alexander Ollischer | Citrix | Microsoft.

Exchange 2016 – Setup fails with error “Service ‘MpsSvc’ failed to reach status ‘Running’ on this server”

$
0
0

Just recently I ran into an error during initial setup of Exchange 2016 on a newly installed Windows Server 2012 R2 stating: “Service ‘MpsSvc’ failed to reach status ‘Running’ on this server“. Further down the troubleshooting road I found out that this quite common error of not being able to start the Windows Firewall service is not Exchange Server specific.

Symptoms

During initial setup the installation seems to freeze at 25% of running the Readiness Checks and Configuring Prerequisites:

Setup seems to take ages while staying at 25% progress. A look into the corresponding ExchangeSetup.log (which can be found in C:\ExchangeSetupLogs) reveals, that Setup is trying to start the Windows Firewall service (MpsSvc) and failes to do so. The ExchangeSetup.log states:

[01.09.2018 13:22:39.0123] [2] Active Directory session settings for ‘start-SetupService’ are: View Entire Forest: ‘True’, Configuration Domain Controller: ‘NBG-DC-12.ctlm.de’, Preferred Global Catalog: ‘NBG-DC-12.ctlm.de’, Preferred Domain Controllers: ‘{ NBG-DC-12.ctlm.de }’

[01.09.2018 13:22:39.0123] [2] User specified parameters: -ServiceName:’MpsSvc’
[01.09.2018 13:22:39.0123] [2] Beginning processing Start-SetupService
[01.09.2018 13:22:39.0123] [2] [WARNING] Service checkpoint has not progressed. Previous checkpoint=’0′- Current checkpoint=’0′.
[01.09.2018 13:22:39.0138] [2] Previous service status query time is ‘09.01.2018 14:22:39’.
[01.09.2018 13:22:39.0138] [2] Current service status query time is ‘09.01.2018 14:22:39’.
[01.09.2018 13:22:39.0138] [2] Will wait ‘2000’ milliseconds for the service ‘MpsSvc’ to reach status ‘Running’.
[01.09.2018 13:22:41.0260] [2] Service ‘MpsSvc’ failed to reach status ‘Running’ on this server after waiting for ‘2000’ milliseconds.
[01.09.2018 13:22:41.0260] [2] [WARNING] Service checkpoint has not progressed. Previous checkpoint=’0′- Current checkpoint=’0′.
[01.09.2018 13:22:41.0260] [2] Previous service status query time is ‘09.01.2018 14:22:39’.
[01.09.2018 13:22:41.0260] [2] Current service status query time is ‘09.01.2018 14:22:41’.
[01.09.2018 13:22:41.0260] [2] Will wait ‘25000’ milliseconds for the service ‘MpsSvc’ to reach status ‘Running’.
[01.09.2018 13:23:06.0494] [2] Service ‘MpsSvc’ failed to reach status ‘Running’ on this server after waiting for ‘25000’ milliseconds.
[01.09.2018 13:23:06.0494] [2] [WARNING] Service checkpoint has not progressed. Previous checkpoint=’0′- Current checkpoint=’0′.
[01.09.2018 13:23:06.0494] [2] Previous service status query time is ‘09.01.2018 14:22:41’.
[01.09.2018 13:23:06.0494] [2] Current service status query time is ‘09.01.2018 14:23:06’.
[01.09.2018 13:23:06.0494] [2] Will wait ‘25000’ milliseconds for the service ‘MpsSvc’ to reach status ‘Running’.

Setup is trying to start the Windows Firewall service for quite some time until it finally gives in and throws the following error message:

Error:
The following error was generated when “$error.Clear();
if (Get-Service MpsSvc* | ?{$_.Name -eq ‘MpsSvc’})
{
Set-Service MpsSvc -StartupType Automatic
Start-SetupService -ServiceName MpsSvc
}
” was run: “Microsoft.Exchange.Configuration.Tasks.ServiceDidNotReachStatusException: Service ‘MpsSvc’ failed to reach status ‘Running’ on this server.
at Microsoft.Exchange.Configuration.Tasks.Task.ThrowError(Exception exception, ErrorCategory errorCategory, Object target, String helpUrl)
at Microsoft.Exchange.Configuration.Tasks.Task.WriteError(Exception exception, ErrorCategory category, Object target)
at Microsoft.Exchange.Management.Tasks.ManageSetupService.WaitForServiceStatus(ServiceController serviceController, ServiceControllerStatus status, Unlimited1 maximumWaitTime, Boolean ignoreFailures, Boolean sendWatsonReportForHungService)
at Microsoft.Exchange.Management.Tasks.ManageSetupService.StartService(ServiceController serviceController, Boolean ignoreServiceStartTimeout, Boolean failIfServiceNotInstalled, Unlimited
1 maximumWaitTime, String[] serviceParameters)
at Microsoft.Exchange.Management.Tasks.ManageSetupService.StartService(String serviceName, Boolean ignoreServiceStartTimeout, Boolean failIfServiceNotInstalled, Unlimited`1 maximumWaitTime, String[] serviceParameters)
at Microsoft.Exchange.Management.Tasks.StartSetupService.InternalProcessRecord()
at Microsoft.Exchange.Configuration.Tasks.Task.<ProcessRecord>b__91_1()
at Microsoft.Exchange.Configuration.Tasks.Task.InvokeRetryableFunc(String funcName, Action func, Boolean terminatePipelineIfFailed)”.

Troubleshooting

Trying to manually start the Windows Firewall service within the Services MMC failes with the following error:

Windows could not start the Windows Firewall on Local Computer. For more information, review the System Event Log. If this is a non-Microsoft service, contact the service vendor, an refer to service-specific error code 5.

An Event entry with ID 7024 is logged once more.

The System Event Log shows an Event ID 7024, Source: Service Control Manager:

The Windows Firewall service terminated with the following service-specific error:
Access is denied.

Someone suggested opening  a command prompt and executing sc sdshow MpsSvc , which shows:

D:(A;;CCLCSWRPWPDTLOCRRC;;;SY)(A;;CCDCLCSWRPWPDTLOCRSDRCWDWO;;;BA)(A;;CCLCSWLOCRRC;;;IU)(A;;CCLCSWLOCRRC;;;SU)(A;;CCLCRP;;;S-1-5-80-2006800713-1441093265-249754844-3404434343-1444102779)S:(AU;FA;CCDCLCSWRPWPDTLOCRSDRCWDWO;;;WD)

Well, quite cryptic and not really helpful, at least for me in the first place. I tried to compare it to working Windows Server 2012 R2 servers, but to no prevail. More information on how to interpret, verify, build your own security subscriptors and set permissions on Windows services via command line can be found here:

To make a long story short: missing or wrong permissions on either Registry and/or Windows Services are not the issue here. 

Solution

Searching the Internet I came across this Microsoft TechCommunity’s thread, mentioning something in terms of setting up Exchange 2016 on a Windows Server Insider Build:

Exchange 2016 requires the full installation of Windows Server (in 2016, it’s called Desktop Experience), and isn’t explictly supported for installation on Server Core.

Alas, finally that rang some bells as I previously struggled with enabling all required Windows Features in order to install Exchange 2016 on a Windows Server 2012 R2, in particular:

  • Desktop Experience
  • Ink and Handwriting Services
  • Media Foundation

Issues posed by the TrustedInstaller service prohibited an successful installation of the aforementioned Windows Features, always reverting to the previous state of my Windows Features set upon reboot:

The Desktop-Experience Windows Feature simpy refused to stay installed:

Due to some Windows Server hardening settings applied via GPO in the affected domain, TrustedInstaller had some issues. I had to install Desktop Experience on a step-by-step basis while disabling the TrustedInstaller service temporarily (as removing the GPO responsible in the first place was not an option). Details on this procedure can be found here and here:

  1. Add-WindowsFeature InkAndHandwritingServices
  2. Reboot
  3. Add-WindowsFeature Server-Media-Foundation
  4. Reboot
  5. Add-WindowsFeature Desktop-Experience
  6. Set-Service -name TrustedInstaller -startupType Disabled
  7. Reboot

Verify that all required Windows Features are still installed:

  1. Get-WindowsFeature InkAndHandwritingServices
  2. Get-WindowsFeature Server-Media-Foundation
  3. Get-WindowsFeature Desktop-Experience
  4. Set-Service -name TrustedInstaller -startupType Automatic
  5. Reboot

Quite tedious, but it seemed to work.

Verdict

After having successfully installed all the required Windows Features, in particular Desktop-Experience, I was able to start the Windows Firewall service and install Exchange 2016 as well. Somewhere, somehow, there seems to be some kind of dependency between those two components. I did some further searching and came up with this thread in the Microsoft TechNet Forums, and it looks like there actually is a connection! This is strange as it never happened before with any of my previous Exchange installations. And even more strange is the fact, that I always disable the Windows Firewall service prior to installing Exchange Server, and it never posed a problem. Seems like Exchange Setup enables and starts the Windows Firewall service on its own accord and does its magic silently in the background. Strange as there even are some articles out there that actually recommend disabling the Windows Firewall service as well as articles stating quite the opposite, especially Paul Cunningham’s own Beware of Bad Advice About Exchange Servers and Windows Firewall. A proposed solution (and not tested by myself) in that case could be:

We’ve seen the similar symptons. Please try manually create the following registry key, and then test to see if Windows Firewall can be started.

HKEY_LOCAL_MACHINE\SYSTEM\CurrentControlSet\Services\MpsSvc\Parameters\ACService

Further reading:

The post Exchange 2016 – Setup fails with error “Service ‘MpsSvc’ failed to reach status ‘Running’ on this server” appeared first on blog - Alexander Ollischer | Citrix | Microsoft.

Citrix NetScaler – Firmware Upgrade using CLI

$
0
0

Citrix NetScaler – Firmware Upgrade using CLI

Upgrade methodology

  1. Download latest firmware from Citrix Homepage
  2. Backup existing NetScaler config
  3. Copy firmware to Netscaler
  4. Upgrade firmware via CLI
  5. Reboot NetScaler
  6. Verify configuration and functionality

Requirements

  1. Latest NetScaler firmware tar file
  2. Windows Client or Server
  3. Putty Client
  4. WinSCP Client
  5. NetScaler being accessible via SSH (Port 22)

As per Citrix:

Warning! Any customization within NetScaler or NetScaler Gateway might cause unexpected behavior during and after the upgrade or the downgrade process, and possible configuration loss. Any sort of customization within NetScaler or NetScaler Gateway should be backed up and removed before the upgrade or the downgrade process.

How to backup a existing NetScaler configuration

See my other blog entry on automated NetScaler backups:

  1. with GUI
  2. with CLI
  3. with Nitro/Powershell

Upgrade firmware via CLI

Before you run the install script, the files must be extracted and placed on the appliance. Use the following command to uncompress the bundle located, for instance, in /var/nsinstall/build-11.0-64.34_nc/:

tar -zxvf <archive_filename>.tgz

ns_install_01

The run the following command to initiate the upgrade process:

./installns

ns_install_02

root@ns# ./installns
installns: [78217]: BEGIN_TIME 1444030959 Mon Oct  5 09:42:39 2015
installns: [78217]: VERSION ns-11.0-62.10.gz
installns: [78217]: VARIANT v
installns: [78217]: No options

installns version (11.0-62.10) kernel (ns-11.0-62.10.gz)

installns: [78217]: installns version (11.0-62.10) kernel (ns-11.0-62.10.gz)

The Netscaler version 11.0-62.10 checksum file is located on
http://www.mycitrix.com under Support > Downloads > Citrix NetScaler.
Select the Release 11.0-62.10 link and expand the “Show Documentation” link
to view the SHA2 checksum file for build 11.0-62.10.

There may be a pause of up to 3 minutes while data is written to the flash.
Do not interrupt the installation process once it has begun.

Installation will proceed in 5 seconds, CTRL-C to abort
Installation is starting …
installns: [78217]: Installation is starting …
installns: [78217]: detected  Version >= NS6.0
installns: [78217]: Installation path for kernel is /flash

CallHome feature is currently disabled. Enabling this feature lets this
NetScaler device/instance automatically alert Citrix support on detecting
critical errors and/or potential failures, before it impacts your network.
You can also configure this feature anytime using the command line interface
(“enable feature callhome”) or the configuration utility.  Please see the
documentation for further details.
Do you want to enable it NOW? [Y/N] N

installns: [78336]: Size of kernel ns-11.0-62.10.gz is 130936 kilobytes
installns: [78336]: Available space on /flash/ filesystem is 842440 kilobytes
installns: [78336]: Available space on /var is 7626642 kilobytes
installns: [78336]: Checking directories …
installns: [78336]: Checksumming ns-11.0-62.10.gz  …
installns: [78336]: Checksum ok.
Copying ns-11.0-62.10.gz to /flash/ns-11.0-62.10.gz …
installns: [78336]: Copying ns-11.0-62.10.gz to /flash/ns-11.0-62.10.gz …
installns: [78336]: BEGIN KERNEL_COPY
…………….
installns: [78336]: END KERNEL_COPY
installns: [78336]: Changing /flash/boot/loader.conf for ns-11.0-62.10 …

Installing XML API documentation…
installns: [78336]: Installing XML API documentation…
Installing NSConfig.wsdl…
installns: [78336]: Installing NSConfig.wsdl…
Installing NSStat.wsdl…
installns: [78336]: Installing NSStat.wsdl…
Installing online help…
installns: [78336]: Installing online help…
Installing Cisco online help…
installns: [78336]: Installing Cisco online help…
Installing Logon Point …
installns: [78336]: Installing Logon Point …
Couldnt execute eula_upgrade.pl error: 6400
installns: [78336]: Couldnt execute eula_upgrade.pl error: 6400
Installing Login Schema files …
installns: [78336]: Installing Login Schema files …
Installing SCOM Management Pack…
installns: [78336]: Installing SCOM Management Pack…
Installing LoadBalancer Pack…
installns: [78336]: Installing LoadBalancer Pack…
Installing GUI…
installns: [78336]: Installing GUI…
Installing EPA Package …
installns: [78336]: Installing EPA Package …
Installing Mac EPA and Mac EPA version file…
Installing Linux EPA and Linux EPA version file…

installns: [78336]: Installing Linux EPA and Linux EPA version file…

Installing NITRO…
installns: [78336]: Installing NITRO…
Installing Debian, RPM packages …
installns: [78336]: Installing Debian, RPM packages …
Installing Jazz certificate …
installns: [78336]: Installing Jazz certificate …
Installing Call Home certificate …
installns: [78336]: Installing Call Home certificate …
Installing Upload server certificate …
installns: [78336]: Installing Upload server certificate …
/var/opt/nfast directory exists. Extracting hardserver files.
installns: [78336]: /var/opt/nfast directory exists. Extracting hardserver files.
Creating before PE start upgrade script …
installns: [78336]: Creating before PE start upgrade script …
Creating after upgrade script …
installns: [78336]: Creating after upgrade script …
installns: [78336]: prompting for reboot
installns: [78336]: END_TIME 1444031171 Mon Oct  5 09:46:11 2015

Installation has completed.

Reboot NOW? [Y/N] Y

ns_install_03

After the upgrade has been successfully completed simply reboot your NetScaler by entering Y and pressing <Enter>. After abouot 90 seconds the NetScaler will be back online and accessible through your browser. Log back in and verify whether the upgrade has been completed successfully by checking your firmware version and license status:

netscaler_upgrade_13

netscaler_upgrade_14

In case you get bogged by the newly added feature called CUXIP (Citrix User Experience Improvement Program), you’re free to chose whether you want to enable it or not.

ns_install_04

After that verify the NetScaler Gateway’s functionality by logging in to your vServer’s public Gateway and launching any published resources.

Further reading:

The post Citrix NetScaler – Firmware Upgrade using CLI appeared first on blog - Alexander Ollischer | Citrix | Microsoft.

Citrix XenDesktop 7.x – Citrix Session Printers are not visible via Control Panel, Devices And Printers

$
0
0

Citrix XenDesktop 7.x – Citrix Session Printers are not visible via Control Panel, Devices And Printers

Affected System: Windows Server 2012 R2 as well as Windows Server 2016

Citrix Environment: XenDesktop 7.15 LTSR CU2

In my case the solution came down to missing services running on my XenDesktop servers due to hardening the servers prior to provisioning them. I ran a couple of hardening scripts, which disabled a lot of so-called unnecessary services which resulted in the aforementioned issue. The affected services are:

  • Device Install Service (DeviceInstall)
  • Device Management Enrollment Service (DmEnrollmentSvc)
  • Device Setup Manager (DsmSvc)

They were disabled and I had to revert them to the default setting, i.e. 

  • Device Install Service (DeviceInstall) | Manual (Trigger Start)
  • Device Management Enrollment Service (DmEnrollmentSvc) | Manual 
  • Device Setup Manager (DsmSvc) | Manual (Trigger Start)

After resetting the services via Group Policy everything worked as expected.

Further reading:

The post Citrix XenDesktop 7.x – Citrix Session Printers are not visible via Control Panel, Devices And Printers appeared first on blog - Alexander Ollischer | Citrix | Microsoft.


Microsoft Exchange 2016 and IIS 8.5+ – Enable HTTP Strict Transport Security (HSTS)

$
0
0

As part of my Security Best Practices regarding Microsoft Exchange and Microsoft IIS I always implement a couple of configuration settings to harden the underlying IIS, e.g.

  • disabling the “X-AspNet-Version” header,
  • disabling deprecated and/or unsecure protocols,
  • disabling deprecated and/or unsecure ciphers,
  • setting up for SSL Perfect Forward Secrecy,
  • enabling TLS 1.2,
  • et al

In order to tighten your security on Exchange 2016’s IIS you should at least start with enabling HTTP Strict Transport Security (HSTS) which I’m going to describe here. As per Microsoft:

HTTP Strict Transport Security (HSTS), specified in RFC 6797, allows a website to declare itself as a secure host and to inform browsers that it should be contacted only through HTTPS connections. HSTS is an opt-in security enhancement that enforces HTTPS and significantly reduces the ability of man-in-the-middle type attacks to intercept requests and responses between servers and clients.

There are a couple of recommendations and Best Practices available that give further information on how to harden Windows Server 2012 R2/2016 as well as Exchange 2013/2016, respectively. In this article I will focus on HSTS only as I didn’t find any particular articles outlining this issue […]. Please check the Further reading section at the bottom of thids article for more information, e.g. IIS Crypto by Nartac Software:

IIS Crypto is a free tool that gives administrators the ability to enable or disable protocols, ciphers, hashes and key exchange algorithms on Windows Server 2008, 2012 and 2016. It also lets you reorder SSL/TLS cipher suites offered by IIS, implement best practices with a single click, create custom templates and test your website.

You could always have a look at Center for Internet Security’s (CIS) Benchmark Documents as well, e .g. for Microsoft Exchange Server 2016, which provides a “prescriptive guidance for establishing a secure configuration posture for Microsoft Exchange Server 2016” and “was tested against Microsoft Exchange Server 2016.”

Windows Server 2012 R2 (IIS 8.5)

1. Open the Internet Information Services (IIS) Manager console, and click your server. Then click HTTP Response Headers in the IIS section of the middle pane:

2. Click Add in the Actions pane on the right, enter the following values in the Add Custom HTTP Response Header dialogue window, then click OK:

  • Name: Strict-Transport-Security
  • Value: max-age=31536000

3. The newly added Custom HTTP Response Header will be added to the list of configured HTTP Response Headers in the middle pane:

4. The new setting will become effective immediately. You don’t have to iisreset your Exchange server.

Windows Server 2016 (IIS 10)

With IIS 10.0 version 1709 onwards Microsoft has implemented native HSTS support. Have a look at IIS 10.0 Version 1709 Native HSTS Support on how to configure HSTS in Windows Server 2016 version 1709+ via Powershell:

Import-Module IISAdministration
Reset-IISServerManager -Confirm:$false
Start-IISCommitDelay

$sitesCollection = Get-IISConfigSection -SectionPath "system.applicationHost/sites" | Get-IISConfigCollection
$siteElement = Get-IISConfigCollectionElement -ConfigCollection $sitesCollection -ConfigAttribute @{"name"="Contoso"}
$hstsElement = Get-IISConfigElement -ConfigElement $siteElement -ChildElementName "hsts"
Set-IISConfigAttributeValue -ConfigElement $hstsElement -AttributeName "enabled" -AttributeValue $true
Set-IISConfigAttributeValue -ConfigElement $hstsElement -AttributeName "max-age" -AttributeValue 31536000
Set-IISConfigAttributeValue -ConfigElement $hstsElement -AttributeName "redirectHttpToHttps" -AttributeValue $true

Stop-IISCommitDelay
Remove-Module IISAdministration

The new setting will become effective immediately. You don’t have to iisreset your Exchange server.

Verification

You can check whether HSTS has been successfully implemented by browsing to SSLLabs’ SSL Server Test page and enter the server’s corresponding hostname (in case it is publicly resolvable and directly reachable from the internet, which often is the case with SMBs):

That’s it! You have successfully enabled HSTS.

Further reading:

The post Microsoft Exchange 2016 and IIS 8.5+ – Enable HTTP Strict Transport Security (HSTS) appeared first on blog - Alexander Ollischer | Citrix | Microsoft.

Microsoft Exchange 2016 Migration – Outlook keeps prompting: “The Microsoft Exchange Administrator has made a change that requires you quit and restart Outlook”

$
0
0

While migrating from Microsoft Exchange 2010 to Exchange 2016 we came upon a typical issue in which Outlook keeps giving the message: “The Microsoft Exchange Administrator has made a change that requires you quit and restart Outlook“. 

This means that users were totally unable to connect to Exchange during the migration and co-existence phase:

The reason for that was quite obvious (at least after we did some research and thinking) as we switched the Client Access from the old Exchange 2010 servers to the newly implemented Exchange 2016 servers, i.e. all client connections have been directed to Exchange 2016 only. As no mailboxes have been migrated at this point in time client connections need then to be down proxied to Exchange 2010 by Exchange 2016. All things considered it could only have been a question of the protocol being used by our Outlook 2010 clients. Assuming that our Outlook 2010 clients try to connect via RPC-over-TCP (as is the default setting configured in all internal Outlook 2010 profiles) this is an expected behaviour as Exchange 2013 and later no longer support RPC-over-TCP connections from client applications. They only support RPC-over-HTTP, in later versions MAPI-over-HTTP (MAPIhttp). An automatic switch in protocol to RPC-over-HTTP does not occur, thus Outlook 2010 won’t find a valid connection end point and cannot be down proxied to Exchange 2010. The importance of this consideration is that if Outlook clients are using RPC-over-TCP prior to being migrated, it becomes even more important to have a process to update those profiles properly.

Required Outlook 2010 version:

In an Outlook profile under Exchange Proxy Settings you’ll find two options regarding fast and slow networks:

  • On fast networks, connect using HTTP first, then connect using TCP/IP
  • On slow networks, connect using HTTP first, then connect using TCP/IP

In order to understand what this setting really means have a look at the article Outlook Anywhere: Fast vs. Slow network connection over HTTP or TCP/IP:

Outlook Anywhere; Emphasis on “Anywhere”
First of all, lets take a closer look at the terms being used here:

  • TCP/IP connection
    This is the traditional (internal) direct-to-Exchange connection also known as a “RPC over TCP” connection or as a (not entirely technical correct) MAPI connection.
  • HTTP or HTTPS connection
    This is the over-the-Internet connection introduced in Outlook 2003 also known as a “RPC over HTTP” connection and nowadays knows as “Outlook Anywhere”.
    As of Outlook 2013 SP1 in combination with Exchange 2013 SP1, this is a MAPI over HTTP connection or simply: MAPI/HTTP.

The description for the HTTP connection doesn’t really hold true anymore as the HTTP connection can also be used internally. In fact, over the past few Exchange versions, the trend was to move away from the direct RCP connections and towards HTTP connections, even internally. Actually, as of Exchange 2013, all Outlook connectivity is taking place via Outlook Anywhere.

So, with having the option On fast networks, connect using HTTP first, then connect using TCP/IP being disabled we receive the aforementioned error:

With having the option On fast networks, connect using HTTP first, then connect using TCP/IP being enabled the connection can be established successfully:

Now, in order to rollout such a configuration change on a large scale (after careful testing of course!) you could utilize GPOs by either configuring the corresponding Outlook setting or by using GPP and manipulating the user’s registry settings directly.

The required Group Policy Setting can be found in the corresponding Microsoft Office ADMX Templates under:

  • User Configuration | Policies | Administrative Templates | Microsoft Outlook 2013 | Account Settings | Exchange
  • User Configuration| Policies | Administrative Templates | Microsoft Outlook 2016 | Account Settings | Exchange

Please keep in mind that this setting is unavailable with Office 2010 ADMX.

Alternatively you could add the setting manually via GPP (Group Policy Preferences) under:

  • User Configuration| Preferences | Windows Settings | Registry

This XML based code looks like this:

<?xml version="1.0" encoding="UTF-8"?>
<Registry uid="{ADF10FBF-F683-4549-A19E-885D5A58D23E}" changed="2018-11-26 11:04:59" image="0" status="RPC" name="RPC" clsid="{9CD4B2F4-923D-47f5-A062-E897DD1DAD50}">
<Properties name="" value="" type="REG_SZ" key="Software\Policies\Microsoft\office\14.0\outlook\RPC" hive="HKEY_CURRENT_USER" default="0" displayDecimal="1" action="C"/>
</Registry>

<?xml version="1.0" encoding="UTF-8"?>
<Registry uid="{0C4FA337-45F4-4A16-965F-48155F45186F}" changed="2018-11-26 11:05:56" image="10" status="ProxyServerFlags" name="ProxyServerFlags" clsid="{9CD4B2F4-923D-47f5-A062-E897DD1DAD50}">
<Properties name="ProxyServerFlags" value="0000002F" type="REG_DWORD" key="Software\Policies\Microsoft\office\14.0\outlook\RPC" hive="HKEY_CURRENT_USER" default="0" displayDecimal="1" action="C"/>
</Registry>

Windows Registry Editor Version 5.00

[HKEY_CURRENT_USER\Software\Policies\Microsoft\office\14.0\outlook\rpc]
"ProxyServerFlags"=dword:0000002f

With having the option On fast networks, connect using HTTP first, then connect using TCP/IP being enabled by GPO or GPP, the settings are greyed out, cannot be changed by the user, and the connection can be established successfully:

The Outlook Connection Status now shows: RPC/HTTP

Prior to switching Client Access from Exchange 2010 to Exchange 2016 all Outlook 2010 clients connected via RPC-over-TCP, which shows as: RPC/TCP

With this configuration adjustment we were able to proceed with the Exchange 2016 migration without having any Outlook 2010 connectivity issues.

Further reading:

The post Microsoft Exchange 2016 Migration – Outlook keeps prompting: “The Microsoft Exchange Administrator has made a change that requires you quit and restart Outlook” appeared first on blog - Alexander Ollischer | Citrix | Microsoft.

Exchange 2016 – Migration of existing, custom Receive Connectors from Exchange 2010 to 2016 results in multiple errors

$
0
0

Another Exchange 2016 migration, another error while trying to migrate custom Receiver Connectors from Exchange 2010 to 2016 …  an analysis.

Courtesy of Shane Jackson it was easy to copy Receive Connectors from Exchange 2010 to Exchange 2013.  The following Powershell lines will help you with that:

# pipe old Receiver Connectors except Default as well as Client into an array
[array]$ReceiveConnectors = Get-ReceiveConnector -Server $OldServer | Where {$_.Name -notlike “Default $($OldServer)” -and $_.Name -notlike “Client $($OldServer)”}

# create new Receive Connectors - WhatIf
$ReceiveConnectors | foreach {
New-ReceiveConnector -Name $_.Name -RemoteIPRanges $_.RemoteIPRanges -bindings $_.Bindings -Banner $_.Banner -ChunkingEnabled $_.ChunkingEnabled -DefaultDomain $_.DefaultDomain -DeliveryStatusNotificationEnabled $_.DeliveryStatusNotificationEnabled -EightBitMimeEnabled $_.EightBitMimeEnabled -DomainSecureEnabled $_.DomainSecureEnabled -LongAddressesEnabled $_.LongAddressesEnabled -OrarEnabled $_.OrarEnabled -Comment $_.Comment -Enabled $_.Enabled -ConnectionTimeout $_.ConnectionTimeout -ConnectionInactivityTimeout $_.ConnectionInactivityTimeout -MessageRateLimit $_.MessageRateLimit -MaxInboundConnection $_.MaxInboundConnection -MaxInboundConnectionPerSource $_.MaxInboundConnectionPerSource -MaxInboundConnectionPercentagePerSource $_.MaxInboundConnectionPercentagePerSource -MaxHeaderSize $_.MaxHeaderSize -MaxHopCount $_.MaxHopCount -MaxLocalHopCount $_.MaxLocalHopCount -MaxLogonFailures $_.MaxLogonFailures -MaxMessageSize $_.MaxMessageSize -MaxProtocolErrors $_.MaxProtocolErrors -MaxRecipientsPerMessage $_.MaxRecipientsPerMessage -PermissionGroups $_.PermissionGroups -PipeliningEnabled $_.PipeLiningEnabled -ProtocolLoggingLevel $_.ProtocolLoggingLevel -RequireEHLODomain $_.RequireEHLODomain -RequireTLS $_.RequireTLS -EnableAuthGSSAPI $_.EnableAuthGSSAPI -ExtendedProtectionPolicy $_.ExtendedProtectionPolicy -SizeEnabled $_.SizeEnabled -TarpitInterval $_.TarpitInterval -Server $NewServer -WhatIf
}

But with Exchange 2016 those handy Powershell lines won’t help you anymore as executing those results in multiple errors:

1st error, due to multiple Receive Connectors listening on port 25:

The values that you specified for the Bindings and RemoteIPRanges parameters conflict with the settings on Receive connector “<Server>\Default Frontend
<Server>”. Receive connectors assigned to different Transport roles on a single server must listen on unique local IP address & port bindings.
+ CategoryInfo : InvalidOperation: (<Server>\Anonymous <Server>:ReceiveConnector) [New-ReceiveConnector], ReceiveConnectorRoleConflictExcept
ion
+ FullyQualifiedErrorId : [Server=<Server>,RequestId=b5f0fc88-538c-49a3-9a8f-9a279fc29e37,TimeStamp=17.01.2018 15:00:24] [FailureCategory=Cmdlet-Receiv
eConnectorRoleConflictException] 8B5C879,Microsoft.Exchange.Management.SystemConfigurationTasks.NewReceiveConnector
+ PSComputerName : <Server>

2nd error, which is sort of specific for my environment, as there were some Custom permissions in place on the Receive Connector being migrated from Exchange 2010 to Exchange 2016:

You can’t use Custom to specify PermissionGroups.
+ CategoryInfo : InvalidOperation: (<Server>\Relay <Server>:ReceiveConnector) [New-ReceiveConnector], CustomCannotBeS…GroupsException
+ FullyQualifiedErrorId : [Server=<Server>,RequestId=b5f0fc88-538c-49a3-9a8f-9a279fc29e37,TimeStamp=17.01.2018 15:00:24] [FailureCategory=Cmdlet-Custom
CannotBeSetForPermissionGroupsException] 22111502,Microsoft.Exchange.Management.SystemConfigurationTasks.NewReceiveConnector
+ PSComputerName : <Server>

Now let’s try the clarify those errors in get rid of them step by step:

1st error: 

Courtesy of Mark Gossa:
“If you want to create a new receive connector that listen on port 25, you can do this but you have to create them it using the Frontend Transport role if you have either an Exchange 2016 server or an Exchange 2013 server with both the CAS and MBX roles installed on the same server.”

This can be achieved by using the TransportRole switch with the -FrontendTransport parameter of the New-ReceiveConnector  cmdlet, e.g.:

New-Receiveconnector -Name "Custom Receive Connector" -RemoteIPRange (“10.10.61.176/32”) -TransportRole "FrontendTransport" -Bindings ("0.0.0.0:25") -usage "Custom" -Server $ENV:localhost

As soon as the custom Receive Connectors have been successfully added we can configure required custom permissions.

2nd error: What are Custom permissions in terms of Receive Connectors?

With Exchange Receive Connectors you can apply different permission settings. But as soon as you apply dedicated AD permissions for a certain user to a Receive Connector, i.e. 

  • ms-Exch-SMTP-Submit
  • ms-Exch-Bypass-Anti-Spam
  • ms-Exch-SMTP-Accept-Any-Recipient
  • et al

via the -ExtendedRights parameter of the Add-ADPermission cmdlet, the PermissionsGroup property will be set to Custom, e.g.

Get-ReceiveConnector "SERVER2016\Custom Receive Connector" | Add-ADPermission -User DOMAIN\SpecialUser -ExtendedRights ms-Exch-SMTP-Submit,ms-Exch-Bypass-Anti-Spam,ms-Exch-SMTP-Accept-Any-Recipient

In order to copy those custom AD permissions from an existing Receive Connector to a new Receive Connector destined for Exchange 2016, you first have to identify them by running:

Get-ReceiveConnector "SERVER2010\Custom Receive Connector" | Get-ADPermission | ? {$_.ExtendedRights} | ? {[string]$_.ExtendedRights -like "Ms-Exch*"} | select identity,user,extendedrights

The result might look something like this:

Relay permissions are an Active Directory permission and not an Exchange permission. Thus most of these settings are easy to identify and copy, except the ability of a Receive Connector to perform as an external relay which is configured using the ms-Exch-SMTP-Accept-Any-Recipient extended AD permission which is not so visible. In order to reduce the output of the aforementioned cmdlet the following EMS one-liner is useful. It helps to determine which receive connectors in the organization are open relay connectors so you can configure the new ones likewise:

Get-ReceiveConnector | Get-ADPermission | where {$_.identity -notlike "*Default*" -and $_.identity -notlike "*Client*" -and $_.user -like "NT AUTHORITY\*" -and $_.ExtendedRights -like "MS-Exch-SMTP-Accept-Any-Recipient"} | select identity, user, ExtendedRights

The result might look something like this where I identified two custom Receive Connectors for open relaying:

Custom permissions can also be viewed in the configuration portion of the AD schema using ADSIEdit. The Receive Connectors can be found under:

CN=Custom Receive Connector,CN=SMTP Receive Connectors,CN=Protocols,CN=SERVER2010,CN=Servers,CN=Exchange Administrative Group (FYDIBOHF23SPDLT),CN=Administrative Groups,CN=MYORG,CN=Microsoft Exchange,CN=Services,CN=Configuration,DC=domain,DC=local

Now you can add identified and required permissions to your custom Receive Connector, i.e. if you need to be able to send mail outside your organization you will need to add the MS-Exch-SMTP-Accept-Any-Recipient permission by executing:

Get-ReceiveConnector "SERVER2016\Custom Receive Connector" | Add-ADPermission -User 'NT AUTHORITY\Anonymous Logon' -ExtendedRights MS-Exch-SMTP-Accept-Any-Recipient

Further reading:

The post Exchange 2016 – Migration of existing, custom Receive Connectors from Exchange 2010 to 2016 results in multiple errors appeared first on blog - Alexander Ollischer | Citrix | Microsoft.

Exchange 2010 – Outlook 2010 OAB download failes with error 0x80190194 – A troubleshooting approach

$
0
0

Just recently I came across an interesting support case which involved an Exchange 2010 Offline Address Book (OAB) and Outlook 2010 clients trying to download it. The affected users received  an error stating: Error 0x80190194 – The operation failed. Problem is, this is a very common error when downloading the OAB and there are many server side problems which can generate this error:


This error can be caused by many a issues, e.g.

  • missing IIS and/or folder permissions (server-side)
  • IIS authentication issues (server-side)
  • IIS misconfigured http redirection (server-side)
  • file replication service issues (server-side)
  • missing or misconfigured OAB distribution settings (server-side)
  • OAB generating mailbox issues (server-side)
  • DAG replication issues and arbitration mailbox (server-side)
  • missing or misconfigured proxy settings (client-side)
  • download issues in terms of BITS (client-side)
  • et al

Troubleshooting methodology

In order to identify the affected OAB that my users tried to download I first had to get hands on the corresponding OAB GUID by running:

Get-OfflineAddressBook | ft Name,GUID

With the OAB GUID identified I started testing with a browser by navigating to the corresponding URL https://<ServerFQDN>/OAB/<GUID>/oab.xml, checking each server separately. I thereby received an Error 404 – Not Found on one of my servers, which in turn resulted in the aforementioned Outlook error 0x80190194 for my users. This error (which is basically a 404) appeared sporadically depending on the Exchange 2010 Server they were redirected to through our Load Balancer:

Further research on the server showing the Error 404 in particular showed that OAB with GUID 72189f79-62fa-4bcf-82ea-56dc45cfdeb0 is missing in IIS under the OAB node, thus assuming that this particular OAB has not been replicated between my Exchange 2010 Servers:

Missing OABs in the file system … check the Microsoft Exchange File Distribution Services (MSExchangeFDS) on the affected server

The following location on the Client Access Server can be checked to see if the OAB files have been replicated:

  • %ExchangeInstallPath%ClientAccess\OAB\<GUID>

Permissions should also be checked. If any of the default permissions are locked or are missing, the OAB files might not be replicated. Have a look at How to solve Internal Error 500 when testing connection to the OAB or Exchange 2010: OAB download error 80190194.

I copied the missing web.config file as well an restarted the MSExchangeFDS service, to no prevail. Then I executed Get-OfflineAddressBook “<OAB Name>” | Update-OfflineAddressBook to no prevail. Finally I execute iisreset to no prevail.

Well, checking the distribution methods for the affected OAB revealed that the 2nd Exchange 2010 Server was missing in the Distribution tab of the OAB’s Properties. I should have done this in the first place 🙂

After adding the missing Exchange 2010 Server and restarting the Microsoft Exchange File Distribution service by executing Restart-Service MSExchangeFDS the replication started immediately. The missing OAB showed up in IIS as well as in the folder structure.

Alternatively you could run the following cmdlet to initiate the OAB replication:

Update-FileDistributionService <ServerFQDN> -type oab

But even after a successful OAB replication I still received an http error 500 – Internal Server Error when acessing the OAB via browser in order to verify that everything’s fine:

So, back to the web.config file, that was presumably missing the first time around. What does a web.config file actually do when placed in the OAB file directory:

When you configure Http Redirection a web.config file is created in the OAB directory. This file has incorrect permissions. Assign Read and Read & Execute permission to Autheticated Users group then restart IIS using iisreset /noforce.
Now you can try to download the OAB using Outlook. It may be required to download it twice because sometimes the name of the OAB doesn’t appear at first try.

Well, that didn’t count for me so I checked the web.config and IIS settings to verify whether any settings have been adjusted in the past that I didn’t know of. As that wasn’t the case I deleted it, but the issue still persisted.

Verify OfflineAddressBook property on the affected user’s mailbox and adjust the missing OAB association:

Get-Mailbox <User>| fl Name,OfflineAddressBook
Get-Mailbox <User> | Set-Mailbox -OfflineAddressBook "<OAB Name>"

Further troubleshooting on the client-side:

With a corresponding Event Log entry on the client computer, Event ID 27, Source: Outlook, the issue can be further analyzed by following Microsoft’s KB843483 article:

Protokollname: Application
Quelle:        Outlook
Datum:         05.12.2018 12:28:31
Ereignis-ID:   27
Aufgabenkategorie:Keine
Ebene:         Informationen
Schlüsselwörter:Klassisch
Benutzer:      Nicht zutreffend
Computer:      <Computername>
Beschreibung:
Starting OAB download. (See event data).
Ereignis-XML:
<Event xmlns="http://schemas.microsoft.com/win/2004/08/events/event">
  <System>
    <Provider Name="Outlook" />
    <EventID Qualifiers="16384">27</EventID>
    <Level>4</Level>
    <Task>0</Task>
    <Keywords>0x80000000000000</Keywords>
    <TimeCreated SystemTime="2018-12-05T11:28:31.000000000Z" />
    <EventRecordID>18716</EventRecordID>
    <Channel>Application</Channel>
    <Computer>Computername</Computer>
    <Security />
  </System>
  <EventData>
    <Data>Starting OAB download. (See event data).</Data>
    <Binary>0200000000000000730100007301000073010000000000000000000000000000E9FD00000000000000000000D05B00003C600000306A0000286B0000F8670000601B2E13520B0000000000005C0000002000000005000000000000000000000000000000000000000000000000000000000000000000000000000000000000000000000000000000000000000000000000000000000000000000000000000000000000000000000000000000000000000000000000000000000000000000000000000000000000000000000000000000000000000000000000000000000000005C0063006F006E0073006F0072007300660069006E0061006E007A002E006400650020002D00200041006C006C006500000031623662323737382D643765332D343732612D616234622D64356335343264343836333000</Binary>
  </EventData>
</Event>

Protokollname: Application
Quelle:        Outlook
Datum:         05.12.2018 12:28:45
Ereignis-ID:   27
Aufgabenkategorie:Keine
Ebene:         Warnung
Schlüsselwörter:Klassisch
Benutzer:      Nicht zutreffend
Computer:      <Computername>
Beschreibung:
OAB Download Failed. (Result code in event data).
Ereignis-XML:
<Event xmlns="http://schemas.microsoft.com/win/2004/08/events/event">
  <System>
    <Provider Name="Outlook" />
    <EventID Qualifiers="16384">27</EventID>
    <Level>3</Level>
    <Task>0</Task>
    <Keywords>0x80000000000000</Keywords>
    <TimeCreated SystemTime="2018-12-05T11:28:45.000000000Z" />
    <EventRecordID>18717</EventRecordID>
    <Channel>Application</Channel>
    <Computer>Computername</Computer>
    <Security />
  </System>
  <EventData>
    <Data>OAB Download Failed. (Result code in event data).</Data>
    <Binary>0200000094011980730100007301000073010000000000000000000000000000E9FD00000000000000000000D05B00003C600000306A0000286B0000F8670000601B2E13520B0000000000005C000000200000000400000000000000000000000000000000000000000000000000000000000000000000000000000000000000000000000000000000000000000000000000000000000000000000000000000000000000000000000000000000000000000000000000000000000000000000000000000000000000000000000000000000000000000000000000000000000000</Binary>
  </EventData>
</Event>

In my case the error messages stated exactly what I tried to achieve:

  • Result Code 2, i.e. You forced a full .oab file download manually.

Furthermore I checked some other client-side settings and known issues that could cause an OAB download error, such as whether BITS has some kind of problem when trying to download the OAB. An error 0x80200049 is often caused from the BITS job list being full. To fix this, you must clear/reset the BITS job list. Microsoft outlook uses BITS to download the OAB and if the BITS queue goes full it simply stops:

bitsadmin /list /verbose

bitsadmin /reset

The client-side proxy settings, i.e. the client should have  unobstructed access to Exchange via https:

netsh winhttp show proxy

netsh winhttp reset proxy

netsh winhttp set proxy <proxy>:<port>

In the end the last thing I had to ensure and configure was to enable GlobalWebDistribution for all my Exchange 2010 OABs in order to prevent server-specific connections when clients try to download the OAB:

Get-OfflineAddressBook | Where {$_.ExchangeVersion.ExchangeBuild.Major -Eq 14} | Set-OfflineAddressBook -GlobalWebDistributionEnabled $True -VirtualDirectories $Null

In my particular case that did it: the issue was resolved and setting the VirtualDirectories property to $Null reverted my solution attempt that I suggested previously 🙂 And I can tell you why: because my environment consisted of Exchange 2010 and Exchange 2016 Servers due to being in the middle of a migration.

Update:

With Exchange 2013 onward the CAS role proxies the OAB download request to an appropriate Mailbox role server. The CAS role maintains a log of each request it handles in the log files, present in folder %ExchangeInstallPath%\Logging\HttpProxy\OAB\. These log files are an excellent tool to identify which mailbox server the CAS chose to serve the request. Download issues can be analyzed with log files found in %ExchangeInstall%\Logging\OABDownload. The OAB generation logs can be found in the \Logging\OABGeneratorLog folder.

Maybe one of the steps outlined above will help you, too, to get rid of issues with downloading OABs for good.

Further reading:

The post Exchange 2010 – Outlook 2010 OAB download failes with error 0x80190194 – A troubleshooting approach appeared first on blog - Alexander Ollischer | Citrix | Microsoft.

Citrix NetScaler ADC and ShareFile StorageZone Controller Setup –“The folder you are looking for could not be found” on ShareFile Web App while accessing Network shares

$
0
0

To help you set up NetScaler for ShareFile with on-premises storage zone controllers, an easy-to-use wizard is included in the GUI. The wizard prompts you for basic information about your StorageZones Controller environment and then generates a configuration that:

  • Load balances traffic across StorageZones Controllers
  • Provides user authentication for StorageZone Connectors
  • Validates URI signatures for ShareFile uploads and downloads
  • Terminates SSL connections at the NetScaler appliance

The diagram (courtesy of © Citrix Systems) shows these Netscaler components created by the configuration:

After running the built-in Setup Citrix ADC for ShareFile wizard, users starting complaining that they cannot access their network shares anymore. Those network shares have been provided via the integrated ShareFile Connector’s funcionality and has been up and running very smoothly prior to adding Netscaler to the equation.

As soon as users tried to access a network share via a StorageZone Connector they received an error indicating “Failed to load folder -The folder you are looking for could not be found”:

As per Citrix, you may see following error while accessing Network Shares on ShareFile Web App:

The folder you are looking for could not be found. This can occur if the link you used is incorrect, or if it points to a folder that has been deleted or to which you do not have access.

Mind that this happened with the ShareFile Web App only while accessing network shares, i.e. using within a browser, whereas accessing the exact same network share via Citrix Files for iOS worked like a charm. After having consulted our change management documentation, it quickly became clear that only one culprit could remain, as there has been no change in user passwords, permissions, group memberships, UNC paths regarding the underlying network shares, et al. All users have required permissions. The root cause could only be traced back to the changes in the Netscaler configuration a couple of days earlier. So I started investigating the details of the Setup Citrix ADC for ShareFile wizard, its configuration changes and effects on my setup by reading ShareFile On-prem and NetScaler: A Comprehensive Configuration Guide & Deep Dive, amongst others:

In case you messed up with your ShareFile Configuration: you can try to remove it with Remove ShareFile Configuration

With having a better understanding of all things Netscaler & Sharefile, I did a little research and found a Citrix Discussion dealing with my issue and it turned out that the Setup Citrix ADC for ShareFile wizard (to the contrary) does not handle all the configuration required to access network shares via a StorageZone connector. Further configuration as to be done manually to make it work (again), as can be read here:

To support restricted zones or web access to StorageZone Connectors, you must perform additional NetScaler configuration after you complete the NetScaler for ShareFile wizard.

The additional configuration provides the Netscaler components shown in the following diagram:

The description of the additional configuration of Netscaler in Citrix Docs is – to say the least – not very accurate. Without appropriate formatting of the corresponding text passages and additional depictions illustrating every single configuration step, manual adjustments are difficult to comprehend for non-Netscaler-aficionados. Therefore I’d like to expand on Citrix Docs and provide a more elaborate description of the configuration steps required. So, what do we need to add to the existing Netscaler configuration:

  1. a third NetScaler load-balancing virtual server
  2. a third CS policy to allow anonymous access from clients for the HTTP OPTIONS verb
  3. update the existing CS policy used for traffic to StorageZone Connectors (by default: _SF_CIF_SP_CSPOL)
  4. update the existing CS policy used for traffic to StorageZones for ShareFile Data (by default: _SF_SZ_CSPOL)
  5. create a heartbeat monitor for the StorageZones Controller service and bind it to the CS virtual server for ShareFile
  6. verify the ShareFile Load Balancing configuration

First, add a new Load Balancing vServer as follows:

add lb vserver vsrv_SF_ZONE_OPTION SSL 0.0.0.0 0 -persistenceType NONE -cltTimeout 180	
bind lb vserver vsrv_SF_ZONE_OPTION <NameOfYourSFServer>	
set ssl vserver vsrv_SF_ZONE_OPTION -sslProfile ns_default_ssl_profile_frontend	
bind ssl vserver vsrv_SF_ZONE_OPTION -certkeyName <CertDisplayName>	
add cs policy _SF_ZONE_OPTIONS_CSPOL -rule "HTTP.REQ.METHOD.EQ(\"OPTIONS\")"
Load Balancing vServer settings
bind the corresponding Sharefile Service and certificate

The full policy expression for the newly created CS policy (by default: _SF_ZONE_OPTIONS_CSPOL) should be as follows:

HTTP.REQ.METHOD.EQ("OPTIONS")

Adjust the existing _SF_CIF_SP_CSPOL policy in terms of Expression. The full policy expression for an existing _SF_CIF_SP_CSPOL should be as follows:

HTTP.REQ.URL.CONTAINS("/cifs/") || HTTP.REQ.URL.CONTAINS("/sp/") || HTTP.REQ.URL.CONTAINS("/ProxyService/")
_SF_CIF_SP_CSPOL Policy Expression

Adjust the existing _SF_SZ_CSPOL policy in terms of Expression. The full policy expression for an existing _SF_SZ_CSPOL should be as follows:

HTTP.REQ.URL.CONTAINS("/cifs/").NOT &amp;&amp; HTTP.REQ.URL.CONTAINS("/sp/“).NOT &amp;&amp; HTTP.REQ.URL.CONTAINS("/ProxyService/").NOT
_SF_SZ_CSPOL Policy Expression

In the end your CS policies should look like this (in terms of Expressions):

final CS policies and corresponding Expressions

Now adjust the existing CS vServer for Sharefile (in my case vsrv_SF_CS_ShareFile) regarding its Policy Bindings in that you add the newly created CS Policy (in my case _SF_ZONE_OPTIONS_CSPOL) as the third CS policy with a Priority of 90 and set the Target Load Balancing Virtual Server to the newly created LB vServer (in my case vsrv_SF_ZONE_OPTION):

The StorageZone Hearbeat Monitor can be added using CLI by running the following commands:

add lb monitor SZC_Heartbeat HTTP-ECV -send "GET /heartbeat.aspx" -recv "***ONLINE***” -secure YES
bind service &lt;Name of your LB service i.e. internal SF server> -monitorName SZC_Heartbeat

The newly added StorageZone Heartbeat Monitor should look as follows:

StorageZone Heartbeat Monitor Configuration

The complete CLI command list would look like this, whereas the following values need replacement according to your environment:

  • CertDisplayName (server certificate name you want to bind to your vServer)
  • NameOfYourSFServer (i.e. the Sharefile Server you’ve added to your NetScaler configuration)
  • NameOfYourSFCSvServer (i.e. the Sharefile Content Switching vServer)
add lb vserver vsrv_SF_ZONE_OPTION SSL 0.0.0.0 0 -persistenceType NONE -cltTimeout 180	
bind lb vserver vsrv_SF_ZONE_OPTION <NameOfYourSFServer>	
set ssl vserver vsrv_SF_ZONE_OPTION -sslProfile ns_default_ssl_profile_frontend	
bind ssl vserver vsrv_SF_ZONE_OPTION -certkeyName <CertDisplayName>	
add cs policy _SF_ZONE_OPTIONS_CSPOL -rule "HTTP.REQ.METHOD.EQ(\"OPTIONS\")"	
add cs policy _SF_SZ_CSPOL -rule "HTTP.REQ.URL.CONTAINS(\"/cifs/\").NOT && HTTP.REQ.URL.CONTAINS(\"/sp/\").NOT && HTTP.REQ.URL.CONTAINS(\"/ProxyService/\").NOT"
add cs policy _SF_CIF_SP_CSPOL -rule "HTTP.REQ.URL.CONTAINS(\"/cifs/\") || HTTP.REQ.URL.CONTAINS(\"/sp/\") || HTTP.REQ.URL.CONTAINS(\"/ProxyService/\")"
bind cs vserver <NameOfYourSFCSvServer> -policyName _SF_ZONE_OPTIONS_CSPOL -targetLBVserver vsrv_SF_ZONE_OPTION -priority 90

Finally, go to Traffic Management > Load Balancing > Virtual Servers to view the status of the load balancing virtual servers created for ShareFile. It may look similar to my configuration:

Virtual Servers configured for ShareFile Load Balancing

While testing your new configuration and accessing network shares via ShareFile connectors you should see an increasing hit number in the Hits column of your corresponding CS policies:

Increasing hit number in the Hits column

Update
You have to consider network restrictions as well, as Security can mess with ShareFile traffic and network flow, especially when Firewall settings do not allow corresponding (read: whitelisted) traffic to ShareFile domains, endpoints, and IPs, i.e. the ShareFile Control Plane IP ranges. Have a look at CTX208318 and CTX234446.

In another case, if you attempt to access the ShareFile network share and it prompts for users credentials, the ShareFile Web App credentials may not work. Have a look at CTX233739 as well:

Solution
Authentication settings of an IIS CIFS server on StorageZone Controller needs correction. Please follow the steps to resolve the issue:

1. Log onto the StorageZone Controller(s) and open IIS.
2. Expand Default web site
3. Click on the CIFS virtual directory, then on Authentication.
4. Ensure Anonymous is Enabled
5. ASP .NET Impersonation is Disabled
6. Basic Authentication is Enabled
7. Forms Authentication is Disabled
8. Windows Authentication is Disabled

Reference: The Authentication settings of an IIS CIFS server

Further reading:

The post Citrix NetScaler ADC and ShareFile StorageZone Controller Setup – “The folder you are looking for could not be found” on ShareFile Web App while accessing Network shares appeared first on blog - Alexander Ollischer | Citrix | Microsoft.

Viewing all 59 articles
Browse latest View live